Category Archives: Cloud-OS
Cloud OS Network – Azure & SQL Training for Service Providers & System Integrators
Last two weeks, I have travelled to Sydney, Australia & Kuala Lumpur, Malaysia to provide training to service providers and system integrators in the area, to deliver in-depth hands on training to help them with architecting, designing and implementing SQL cloud solutions in a private and hybrid cloud environment. Training covered the following topics:
- Introduction to SQL 2014 features & capabilities
- Contained databases for multi-tenant database offerings
- Resource Governor for controlling CPU, Memory and Disk IO in a multi-tenant environment
- Advanced Backup & Restore with SQL 2014 (on-premise and cloud)
- Introduction to High Availability & Disaster Recovery
- SQL High Availability with Failover Cluster Instance
- SQL High Availability with AlwaysOn Availability Groups
- Disaster Recovery with Azure as the DR environment
- Establishing hybrid connectivity (VPN) to Azure
- SQL Always On Availability Groups DR setup with Azure
- Enabling SQL service offerings to customers using Windows Azure Pack
- Dev/Test environment setup on Azure
- System Center Operations Manager
Feel free to reach out to me, if you have any follow up questions or need some help. J
Resource Governor at Work with Azure Pack
WAP administrators can use the functionality of SQL Server 2014 Resource Governor with UR5 of Windows Azure Pack. You can read about ‘Manage tenant database workloads with resource governor in WAPack’ here. In this blog post I am detailing the last section ‘Resource Governor at Work’ of the above blog post.
Tools available to generate load on SQL server
Though we can write custom tools (C#, PowerShell) etc. to create test databases and generate load, sometimes publically available tools will come handy. Providing two tools that I have come across.
- Hammer DB (I have used this for various load generation, benchmark verification before/after changing server configuration etc.)
- SQL Load Generator
View CPU Usage for Resource Pools
In this post, I assume that you have followed the instructions provided in the above blog post. In my configuration, I have created the suggested resource pools and created a database named ‘contoso’. I am providing the steps to identify the resource pool name and how to view the performance counters for the resource pool.
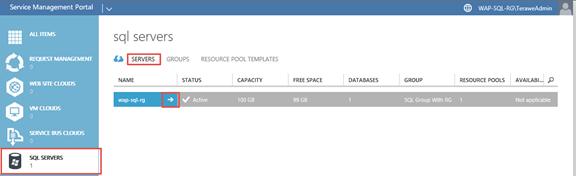
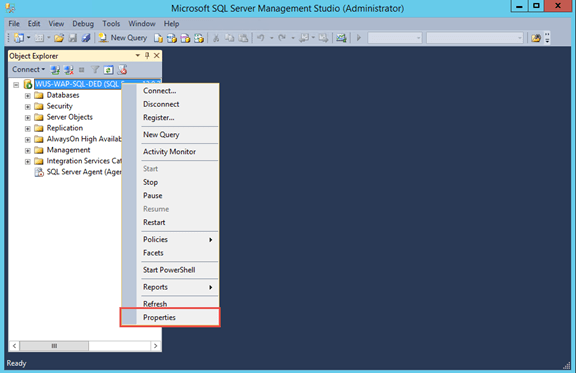
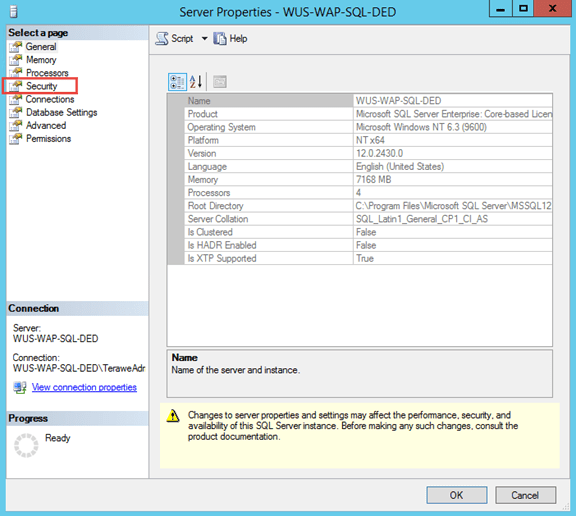
Step 1: Identify the resource pool associated with the database
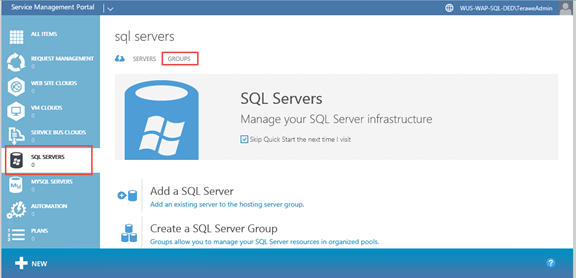
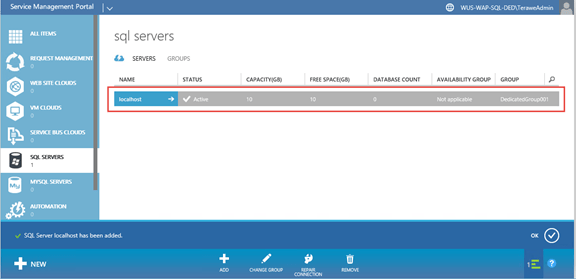
As a service provider administrator, navigate to ‘servers‘ tab in ‘SQL Servers‘ resource provider and navigate to the details of specific server.
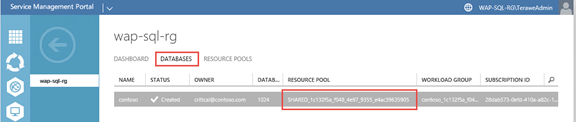
Navigate to the ‘databases‘ tab and find out the ‘resource pool name’.
Step 2: Open performance monitor
You can do this by running ‘perfmon’ on windows run prompt.
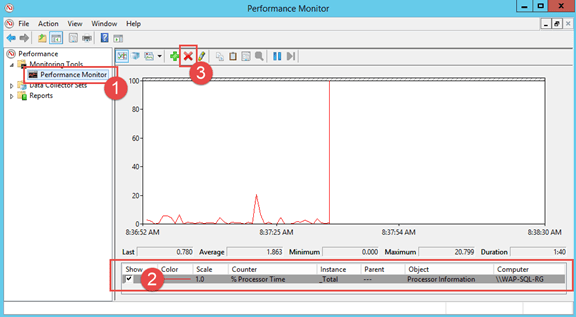
- Navigate to the performance monitor view
- Select any existing counters
- Click on ‘Delete’ to remove the existing counters
- Click on ‘+’ button next to add new counters (in the following step)
Step 3: Add SQL Resource Governor Performance Counter
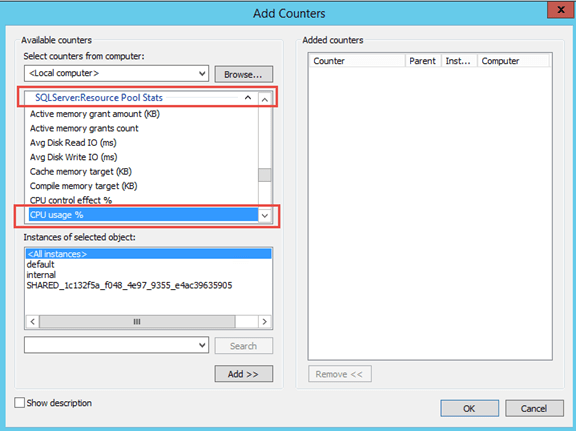
-
Choose counter ‘CPU usage %‘ in ‘SQL Server: Resource Pool Stats‘
Note: You can see that all the resource pools you saw along with databases tab in windows azure pack + two system resource pool instances (default & internal) are listed in the instances section
- Now you can select all instances and click on ‘Add‘ button.
Step 4: Generate load against the databases and watch usage in performance monitor
Windows Azure Pack – Dedicated SQL offering (Part 3)
Part 1: In the part one of this series, we have gone through the step by step instructions of installing and configuring Windows Azure Pack portal and api express on an Azure virtual machine. You can read through the part one of this series here.
Part 2: In the part two of this series, we have gone through the step by step instruction of creating group and server in SQL server resource provider, followed by creating plan and add-on based for providing a dedicated offer. Also, we created a tenant account. You can read through the part two here.
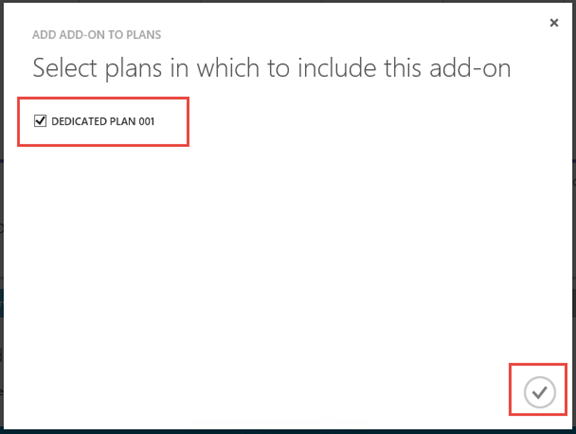
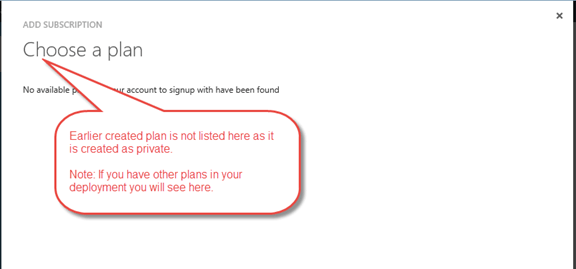
In this post, I am providing the PowerShell script that can be used to assign the private plan and add-on to the tenant. It is possible to assign private plan to tenant from admin portal. However assigning a private add-on to tenant is not enabled from admin portal. So we need to leverage PowerShell script to assign the plan and add-on to tenant.
Step 7: Assign private plan and add-on to tenant by service provider admin
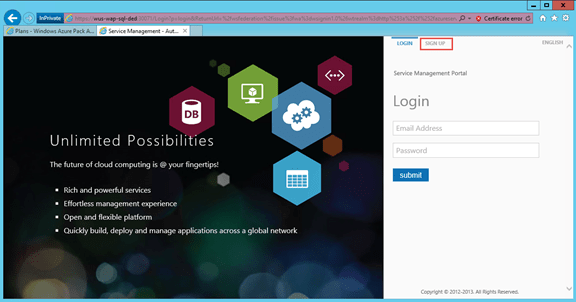
# Assign all variable values specific to your environment
$windowsAuthSiteUri = "https://localhost:30072"
$adminUri  = "https://localhost:30004"
$planName  = "Dedicated Plan 001"
$addonName = "AddOn for Dedicated Plan 001"
$userName  = "admin@tenant.com"

#
# Get Token
$token = Get-MgmtSvcToken `
	-Type Windows `
	-AuthenticationSite $windowsAuthSiteUri `
	-DisableCertificateValidation `
	-ClientRealm "http://azureservices/AdminSite"

#
# Get plan, add-on and user objects
$plan = Get-MgmtSvcPlan `
	-AdminUri $adminUri `
	-Token $Token `
	-DisableCertificateValidation `
	-DisplayName $planName

$addon = Get-MgmtSvcAddOn `
	-AdminUri $adminUri `
	-Token $Token `
	-DisableCertificateValidation `
	-DisplayName $addonName

# Create a new subscription for the user against the dedicated plan
$subscription = Add-MgmtSvcSubscription `
	-AdminUri $adminUri `
	-Token $token `
	-AccountAdminLiveEmailId $userName `
	-AccountAdminLivePuid $userName `
	-PlanId $plan.Id `
	-FriendlyName $planName `
	-DisableCertificateValidation
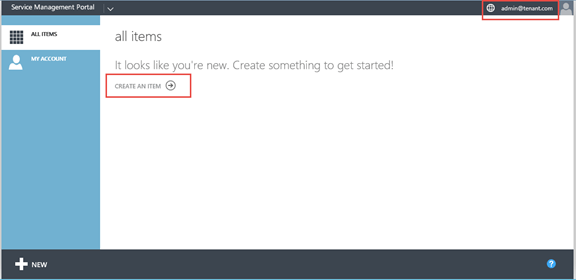
In the last part of this series, I will walk through the tenant experience of creating databases leveraging the dedicated plan/add-on.
Windows Azure Pack – Dedicated SQL offering (Part 2)
In the part one of this series, we have gone through the step by step instructions of installing and configuring Windows Azure Pack portal and api express on an Azure virtual machine. You can read through the part one of this series here.
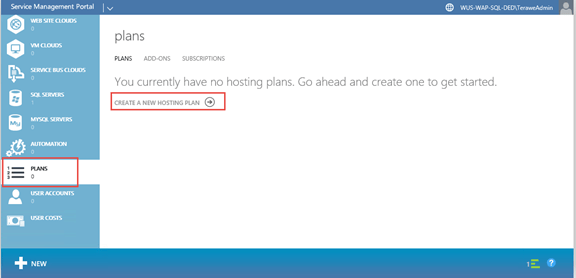
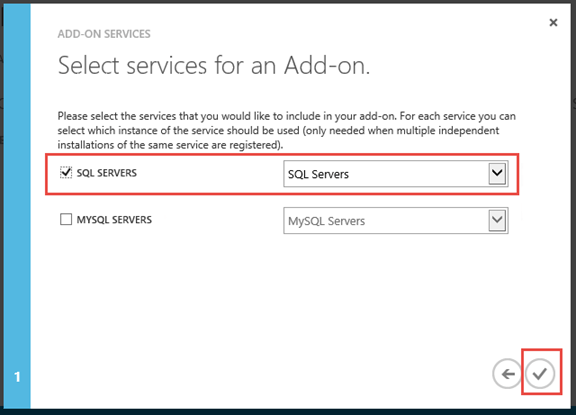
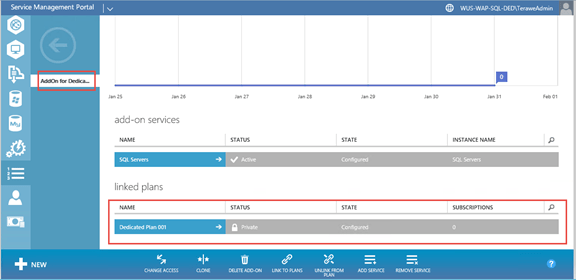
In this post, we will go through creating plan and add-on that will enable us to assign a single server to a single subscription. This is the high level approach.
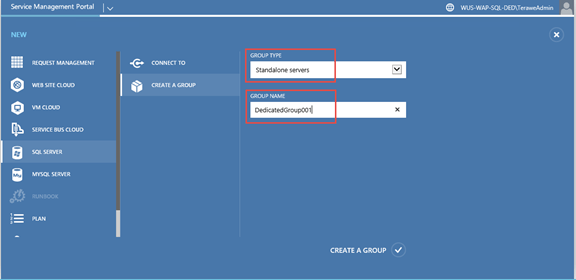
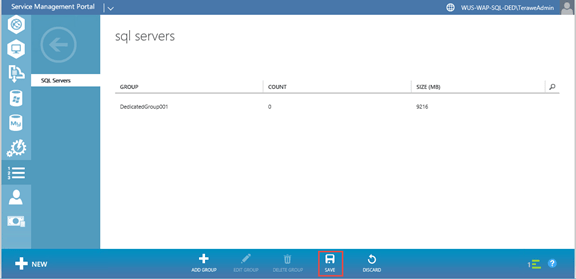
- Add a new group for the dedicated server. Only this dedicated server will be available in this group.
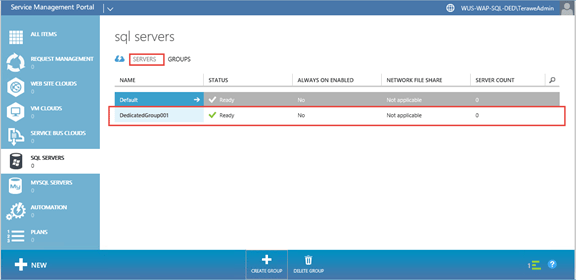
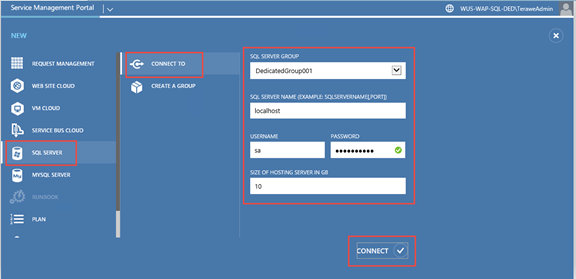
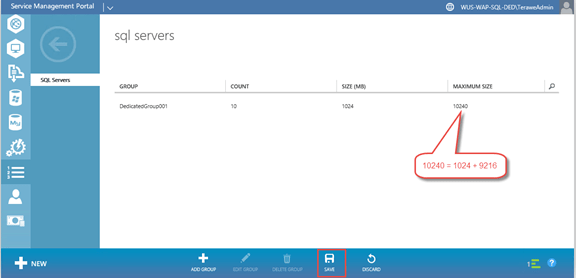
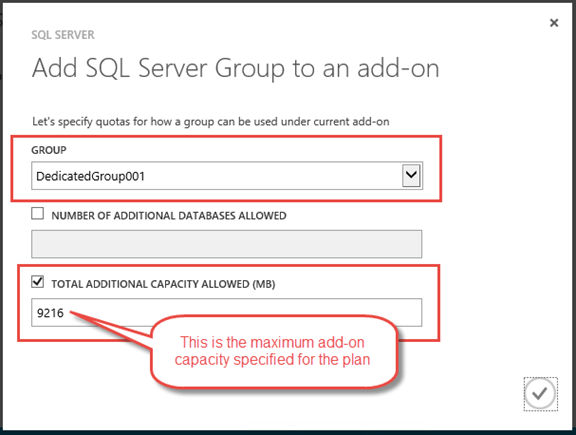
- Add a new SQL server and assign it to the group we created above. Let us assume that this server can support up-to 10GB of data files. And we want to provide 1GB as the minimum database size. With this configuration, tenant can create one 10GB database or ten 1GB databases. Tenant can create a database and can increase the size of database, based on remaining space available on the server (made available through add-on).
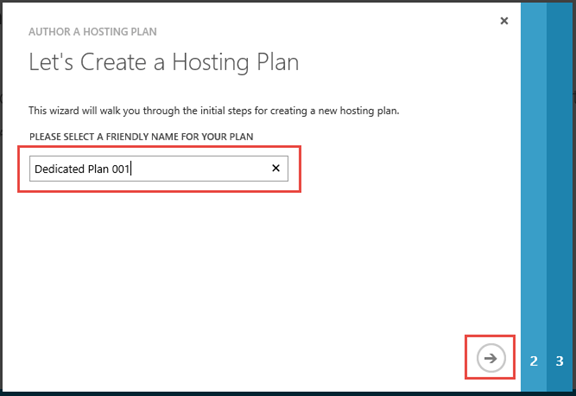
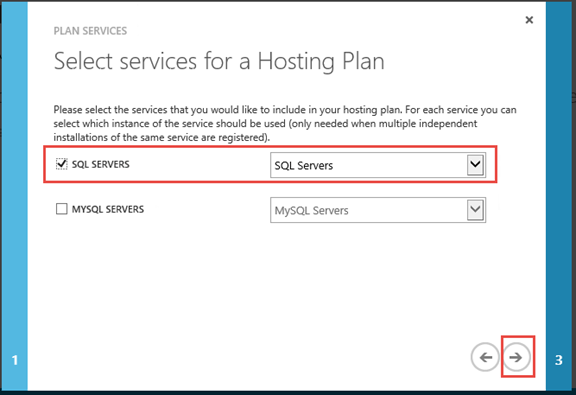
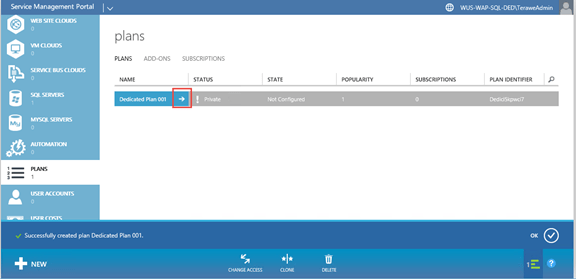
- Now create a new plan. During plan quota configuration, add the group created about. Also, keep the base size as 1GB and allow add-on size of up-to 9GB.
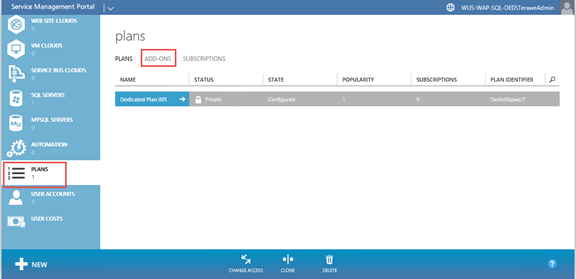
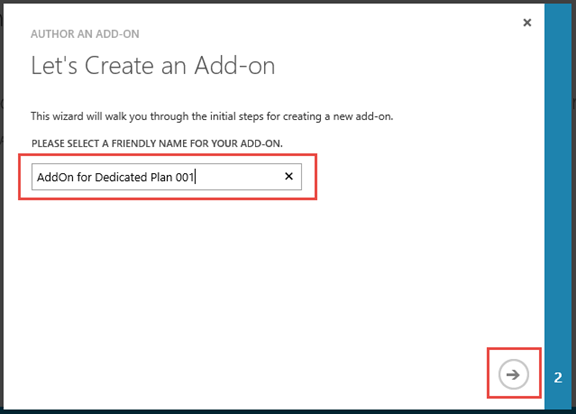
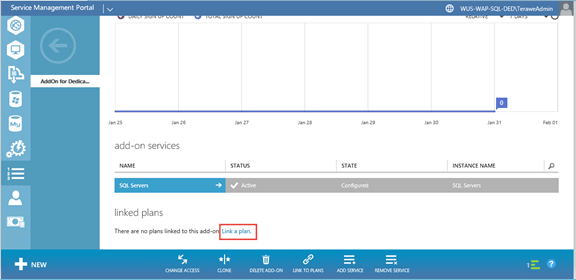
- Create a new add-on and allow tenants to extend capacity by up-to 9GB. Link this plan & add-on.
- Remember, plan and add-on are kept private, so that users can’t sign up for this plan. In the next blog post, I will walk through how to assign the plan & add-on to the user (even though it is private).
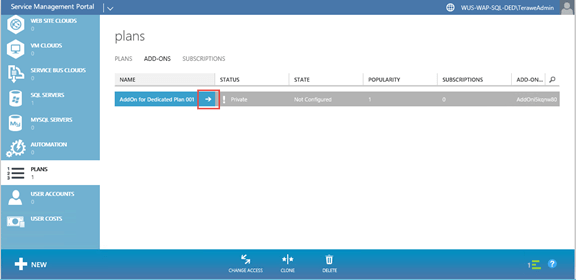
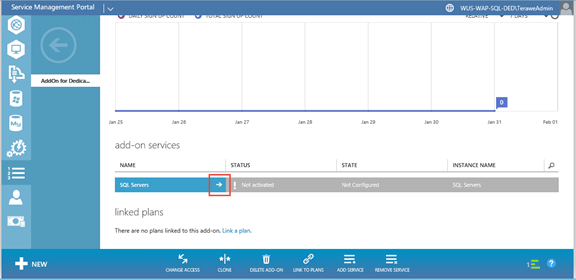
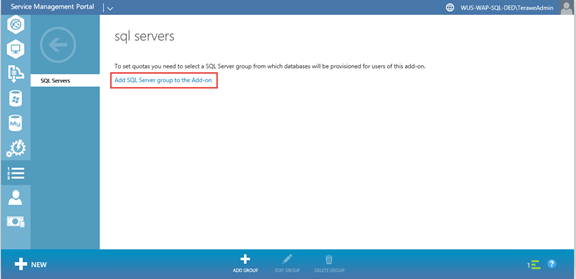
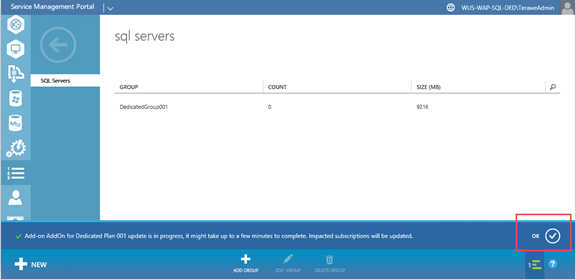
Step 5: Create Group, Server, Plan and Add-On


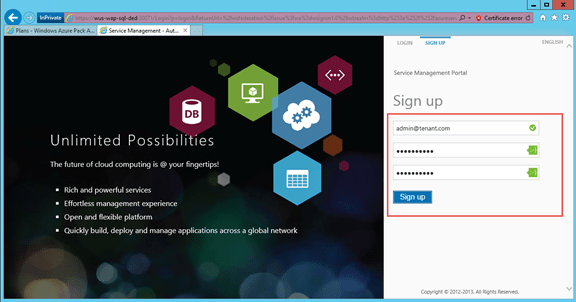
Step 6: Create a new tenant (for test purpose)

You can read through the third part in this series here. This part has the PowerShell script that can be used to assign the private plan and add-on to the tenant.
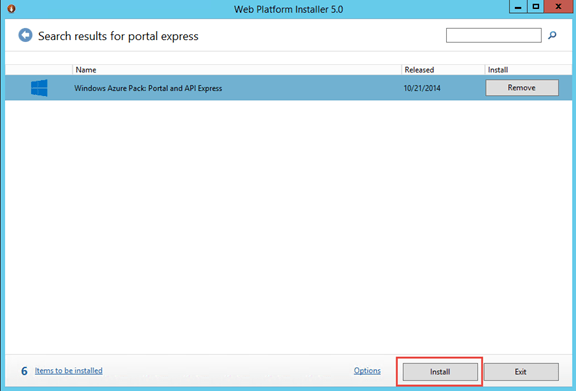
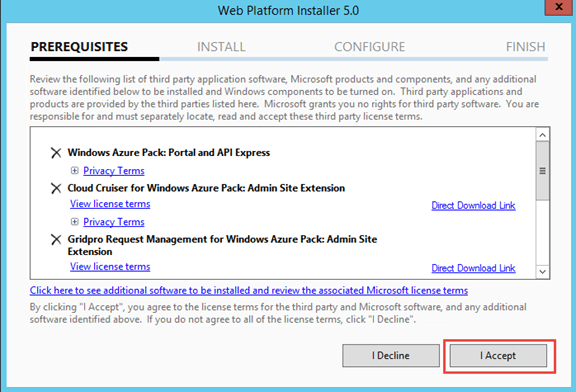
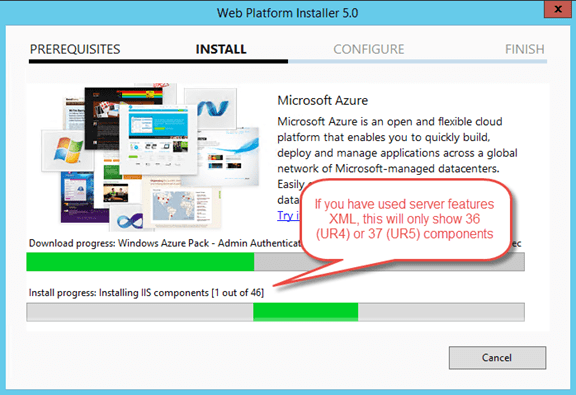
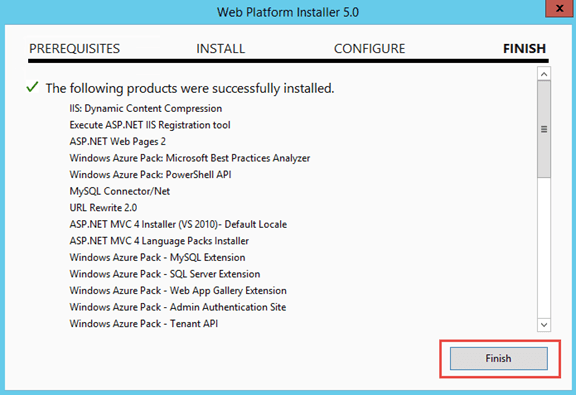
Windows Azure Pack – Dedicated SQL offering (Part 1)
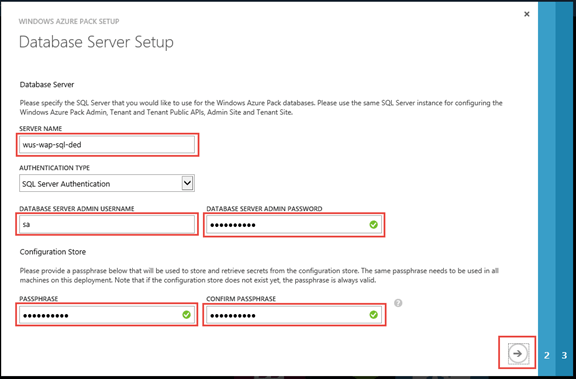
Windows Azure Pack comes with SQL resource provider, which enables service providers to offer shared database services for both standalone (no HA) and highly available databases. This blog is the first in the series where I explain step-by step on how a dedicated SQL offer (this means that a single database server is reserved for a single subscription) leveraging the plans / add-on features. Each instruction / step is shown with the corresponding screen capture. Texts are provided with the screen capture, only if something needs to be called out specifically.
Like always, while testing this out, I have used a virtual machine from Azure. If you are trying this on an on-premise machine, skip the steps accordingly.
This blog covers the first four steps
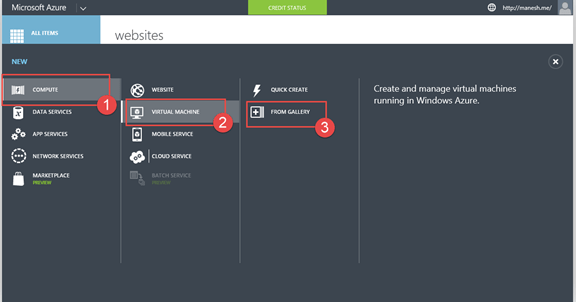
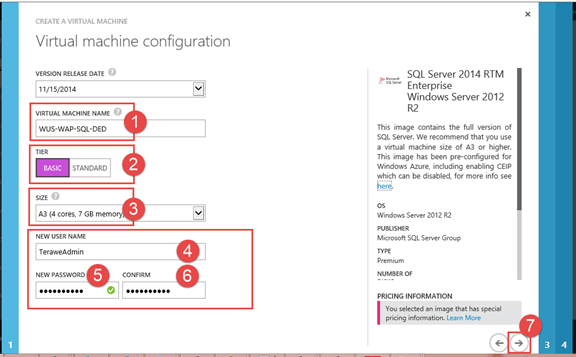
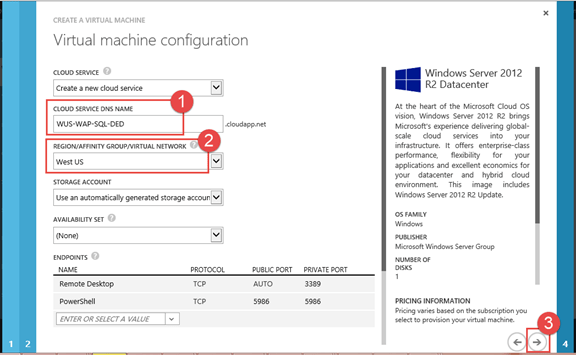
- Create and remote into SQL 2014 virtual machine on Azure
- Install Windows Server Roles & Features
- Enable SQL Authentication and Reset ‘sa’ password
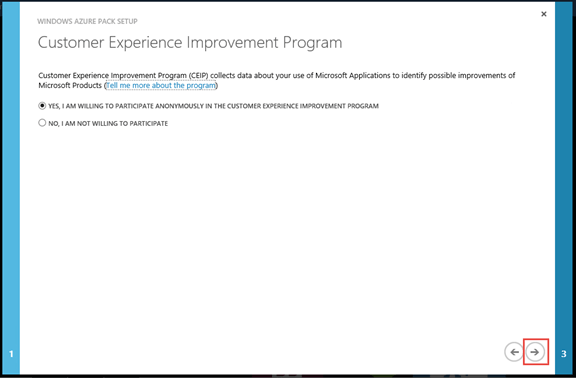
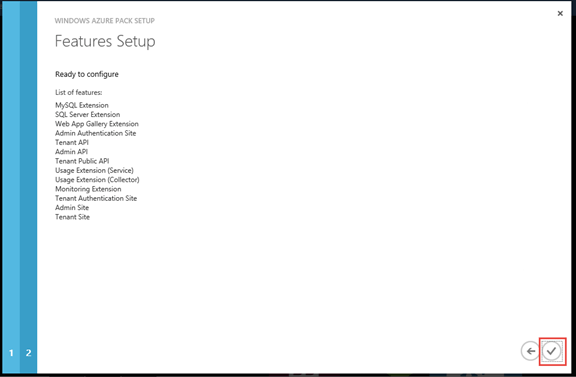
- Install and Configure Windows Azure Pack Portal Express
You can continue reading the second part of this series here.
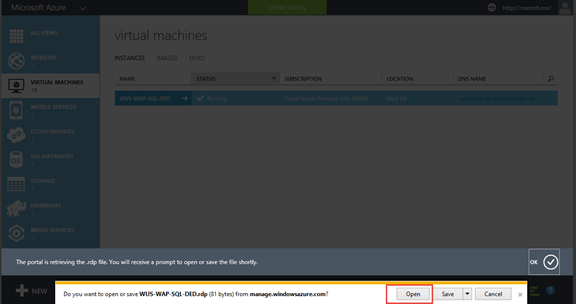
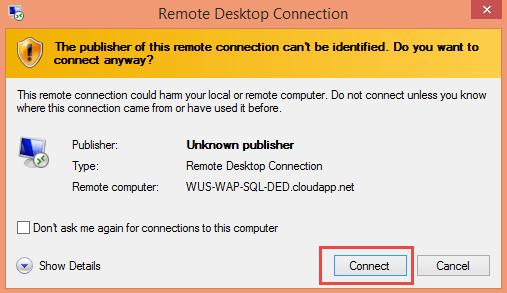
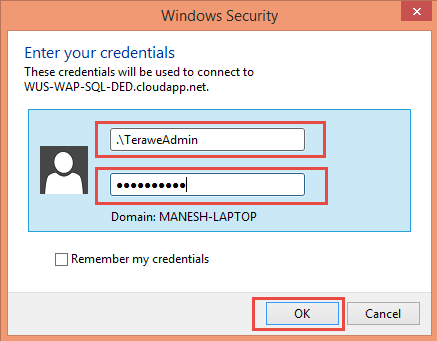
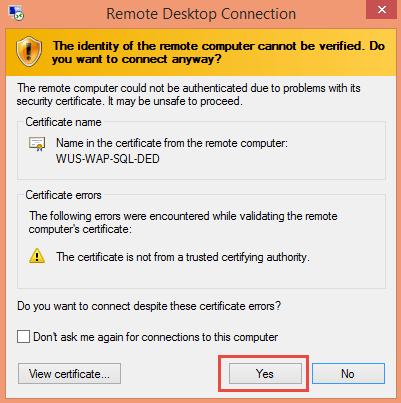
Step 1: Create and remote into SQL 2014 virtual machine on Azure


Step 2: Install Windows Server Roles & Features
Enable the required roles and features for Windows Azure Pack. I have created another blog on how to easily do this using PowerShell. You can follow the steps from here. Note that this step is optional. If you do not do this, Windows Azure Pack Portal Express deployment will do it for you.
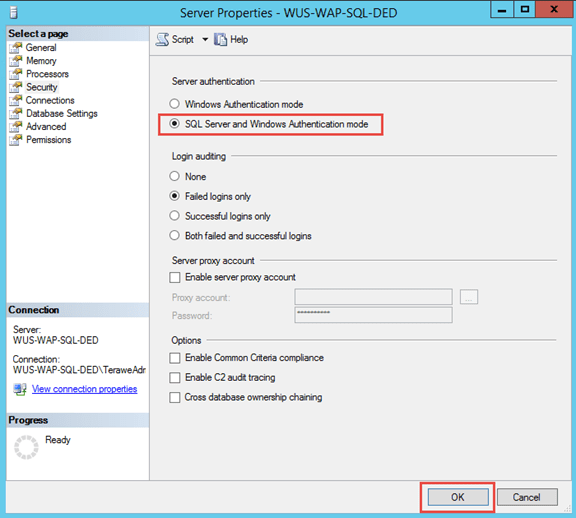
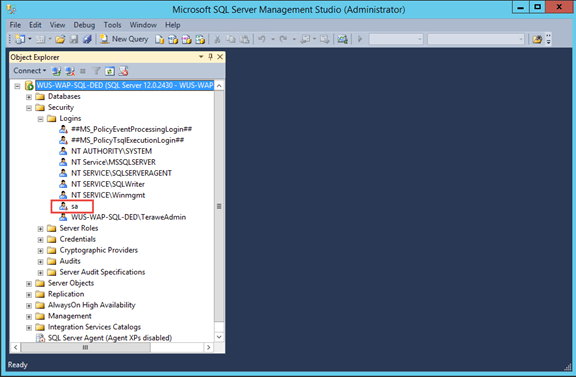
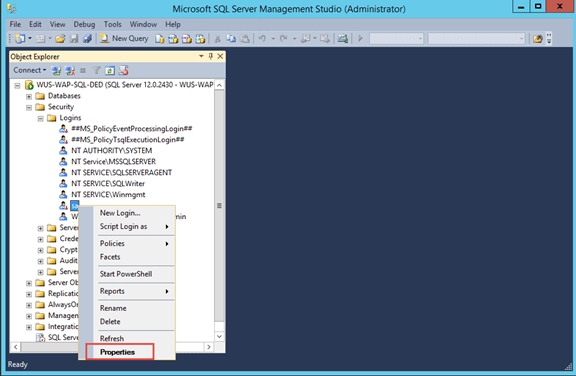
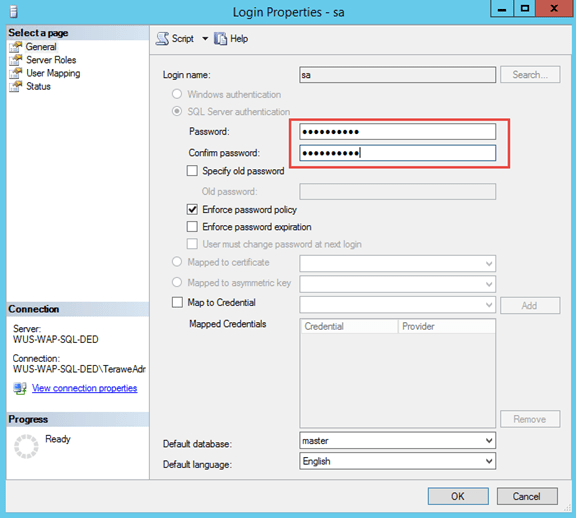
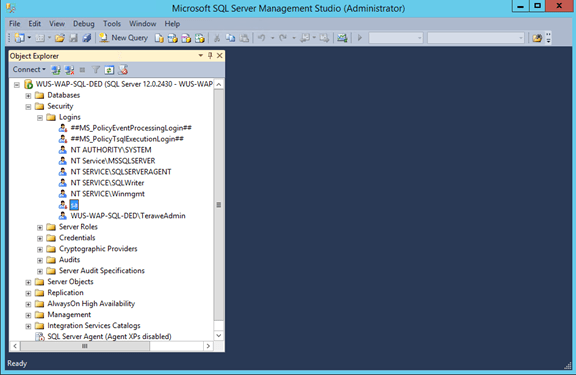
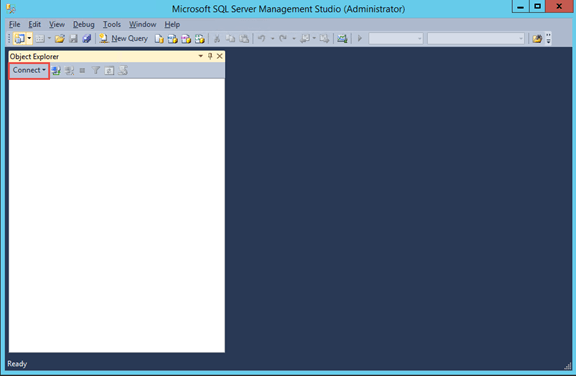
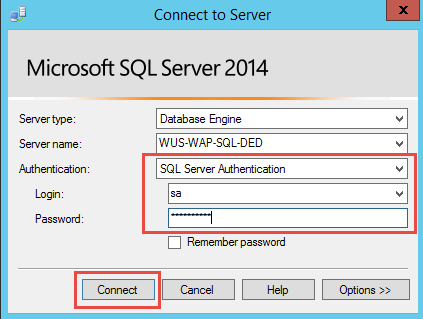
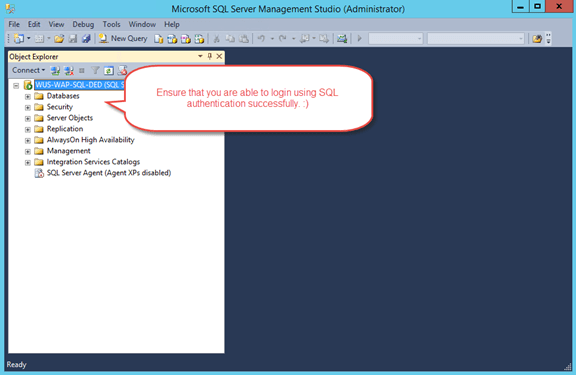
Step 3: Enable SQL Authentication and Reset ‘sa’ password
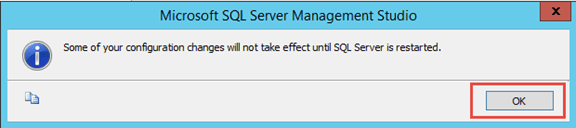
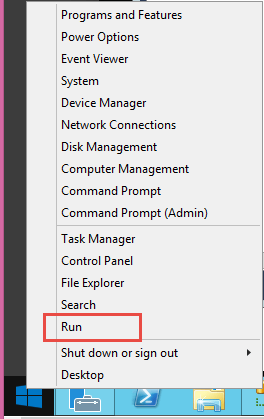
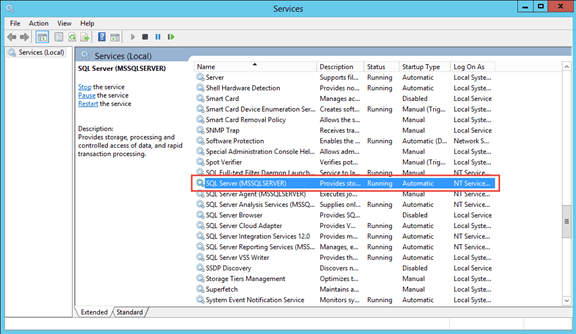
By default, SQL virtual machines on Azure come with Windows Authentication. You need to explicitly enable SQL authentication. Note that you need to restart SQL Server service, after enabling SQL authentication.


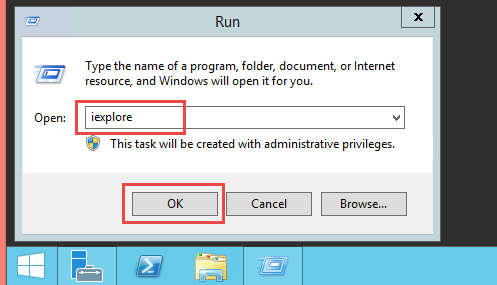
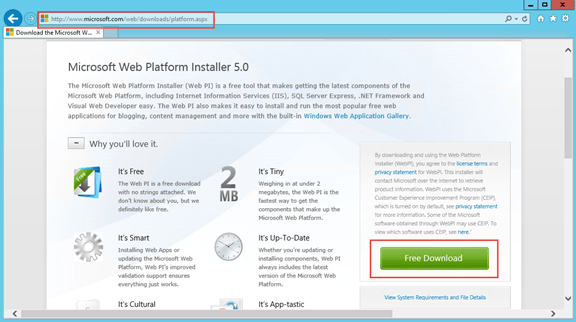
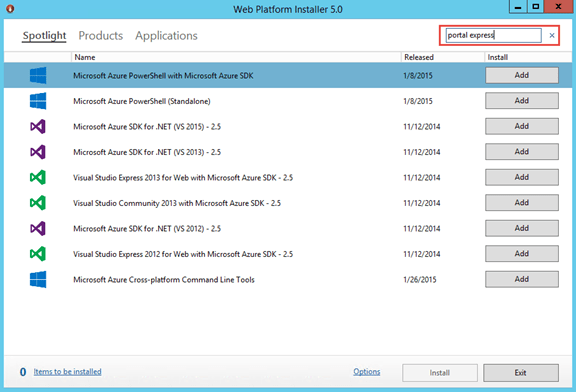
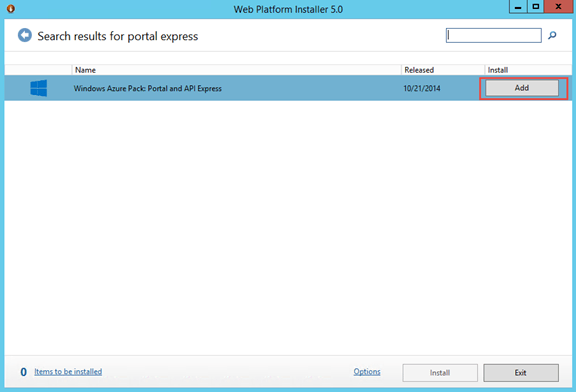
Step 4: Install and Configure Windows Azure Pack Portal Express


You can continue reading the second part of this series here.
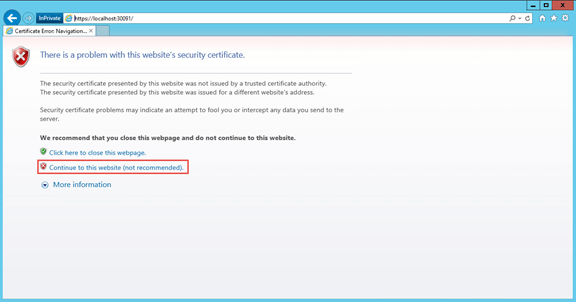
Avoid Certificate Warning on Windows Azure Pack Development Environment
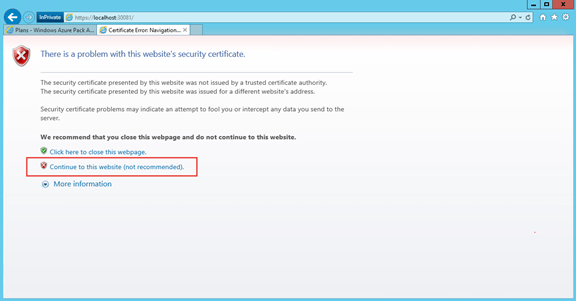
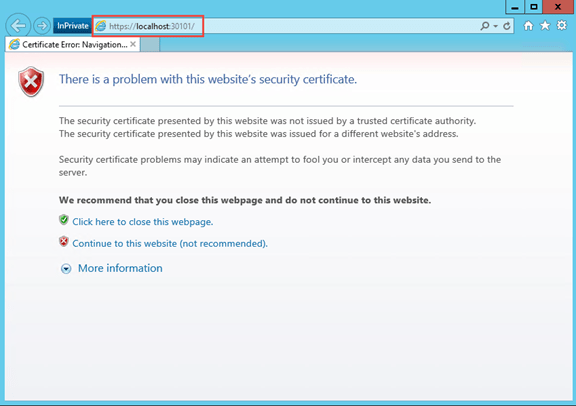
Often, we spin up virtual machines for development & testing purposes of Windows Azure Pack (as part of Team Access Control Resource Provider or other engagements). Typically we develop against an express deployment. One of the very time consuming process during development is to click on ‘continue to this website’ from the certificate validation error message while accessing admin portal & tenant portal. Since the portal automatically redirect to the authentication site, it also prompts for the same, which adds to the pain. 😦
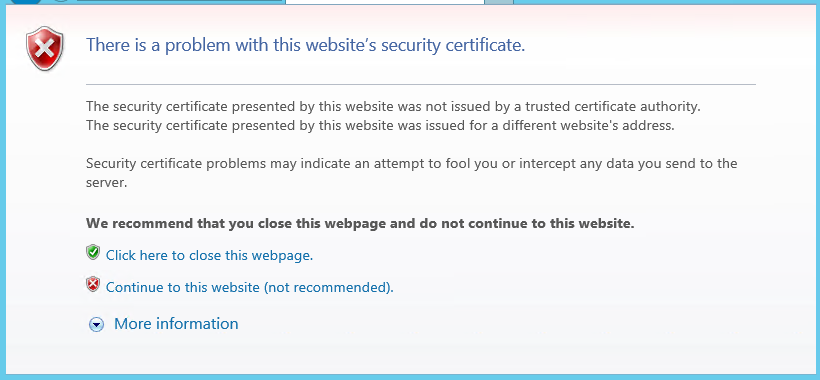
There are two issues with the self-signed certificate.
1. It is not trusted
2. The subject name do not match the website
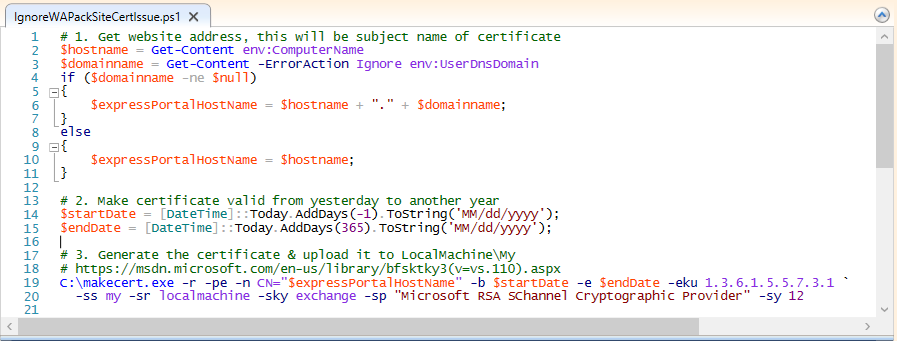
I am providing how we fix this on our development environment. I suggest this to be only used for development / test environments.
Step 1: Create a self-signed certificate with subject name matching website
Step 2: Add the new certificate as a trusted certificate authority

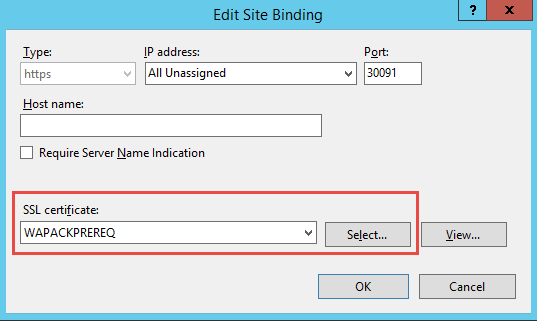
Step 3: Update bindings for sites to use the generated certificate (MgmtSvc-AdminSite, MgmtSvc-AuthSite, MgmtSvc-TenantSite, MgmtSvc-WindowsAuthSite)

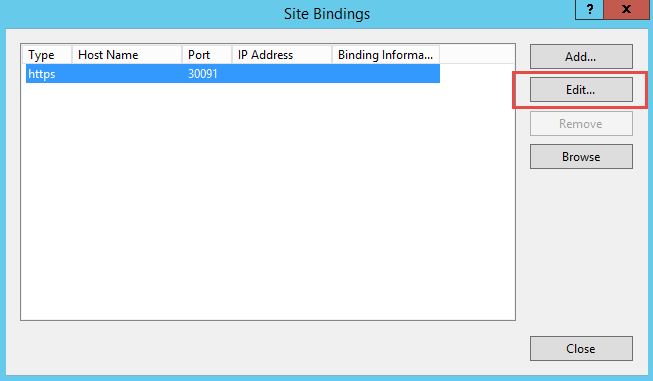
Step 4: Restart IIS & Browser
You can download the PowerShell script referred to in this blog post from here. Hope this helps in improving your productivity. 🙂
Server Roles and Features requirement for Windows Azure Pack
When we install express deployment using Web Platform Installer, it automatically configures all required Windows Server Roles & Features. However, in development environment where we want to build new WAPack virtual machine, it is always better to build the baseline image with all required roles and features.
You can find a reference server configuration file that I generated at Technet Gallery. You can use the following PowerShell scripts to configure server with the pre-requisites.
Using this approach brings down the configuration by Web PI from 53 components to 36 for WAPack UR4.
# If you want to generate the configuration based on an existing WAPack Server
# Get-WindowsFeature |
#       ? { $_.Installed -AND $_.SubFeatures.Count -eq 0 } |
#       Export-Clixml C:\WAPack_ServerRolesAndFeatures.xml

$serverFeatures = Import-Clixml C:\WAPack_ServerRolesAndFeatures.xml
foreach ($feature in $serverFeatures) { `
    Install-WindowsFeature -Name $feature.name `
}
You can find software requirements for Windows Azure Pack express deployment here.
Troubleshoot message flow for Windows Azure Pack
While developing WAP custom resource providers, I have seen myself and others running into the issue of getting 404, resource not found when developing a new API controller.
Typically if we have atleast one API call working against the custom RP, it means that custom resource provider registration is working fine and WAP framework is routing the messages correctly. It is most likely a mismatch between how API client construct the URL or how route configuration is done in Web API. Attaching debugger, doesn’t really help in this scenario, as ASP .NET is not able to find the route to the controller class (yea, that is why it is sending 404). So how do we find out how is the messages get routed.
First and foremost, we need to understand how messages are flowing. Below diagram shows how it will typically be routed in a development boxes (I have marked the default ports in there).

We can use Fiddler tool to capture the traffic and understand the exact messages that are going between various Sites. Since fiddler is a proxy tool, we need to enable proxy at the origin of the message. So if you are interested in finding the messages that Resource Provider API receive, you should set the proxy at Admin API or Tenant API, depending on what specific messages you are trying to look at.
This is what I have done on my test environment (Windows Server 2012 R2), to troubleshoot messages coming to the tenant endpoint on my custom RP.
- Logged on to server as Administrator
- Install Fiddler tool (I used the downloads from Telerik)
- Changed the Identity of ‘Tenant API’ application pool to Administrator

- Opened a new instance of IE and launched Fiddler from Tools > Fiddler
- Configure Fiddler to capture HTTPS traffic (Fiddler : Tools > Fiddler Options)

- Accept the Fiddler Proxy Certificate installation
- From IE, accessed tenant portal and invoked custom resource provider tabs
- Now, messages that goes from Tenant API to custom RP starts showing up in Fiddler.

Note: Fiddler captures all traffic that originate from browser as well. To filter the requests that shows up in Fiddler UI, you can update the ‘Rules’ in Fiddler (Rules > Customize Rules). I have used the following rule to see only the messages that land on my custom resource provider.
static function OnBeforeRequest(oSession: Session) {
if (oSession.host != “twe-wap01:30032”){
oSession[“ui-hide”] = “true”;
}
….
}
Thanks to Manish for helping me with the approach.
Add an existing VM to Windows Azure Pack Subscription
Typically, when we try to set the user role and owner to an existing virtual machine using PowerShell commands, we might get the following error.
Set-SCVirtualMachine: The specified owner is not a valid Active Directory Domain Services account.
Here are couple of blog posts explaining the theory and how to do it correctly.
- Working in VMM like Service Provider Foundation and Windows Azure Pack
- Adding an already running VM to a Windows Azure Pack Subscription
- Assigning Owner and User Role to VMs in Windows Azure Pack
This is a PowerShell script, you could directly use after fixing the variable names in the first section, as you need.
# Edit the following properties according to the environment
$vmmServerName = “sc01.terawelabs.com”;
$tenantName = “jdev@manesh.me”;
$tenantSubscription = “99a39f76-b938-4e75-b8e3-78a24f60add7”;
$vmName = “java-devops-03”;
# Connect to VMM Server
Get-SCVMMServer –ComputerName $vmmServerName – ForOnBehalfOf;
# Tenant user is expected to sign up in WAP Portal and added to a plan with VM Resources
# This will ensure that user role is created in SC, with required quota limits
$roleName = $tenantName + “_” + $tenantSubscription;
$role = Get-SCUserRole –Name $roleName;
Get-SCVirtualMachine –Name $vmName | Set-SCVirtualMachine –UserRole $role;
Get-SCVirtualMachine –Name $vmName | Set-SCVirtualMachine –Owner $tenantName –OnBehalfOfUserRole $role –OnBehalfOfUser $role;
WAP Storage Sample – v0.2 – Enable tenant to upload files
Updated Git Project with changes for version 0.2. In this version following features are enabled.
- Tenants can upload files to the containers they create
- Only small file uploads are supported (content is uploaded in a single API call).
- Demonstrates navigation into tab items
- Demonstrates upload of file using file upload control
If you have any questions on the code sample, need help with some specific scenarios, you can reach me through MSDN forum for WAP. I follow the forum almost daily.
Here is the experience for Tenant for this update.


