Blog Archives
Docker Swarm Cluster using Azure Container Services
Azure Container Service (ACS) is an Azure Compute resource provider to create and manage a cluster of virtual machines that act as container hosts together with a number of “master” machines that are used to orchestrate your application containers. Currently ACS is in preview, and my subscriptions got access to the preview service last week. I will be exploring ACS and blogging about them.
ACS works with Apache Mesos as well as Docker Swarm. In this article, I am sharing my experience on creating Docker Swarm cluster on ACS. For build the service, I used the guidance provided at https://github.com/rgardler/azure-quickstart-templates/blob/acs/acs-docs/101%20Creating%20a%20Service%20using%20the%20Portal.md as the primary reference.
Prerequisites
- Microsoft Azure Subscription enabled with ACS preview: If you need access, please request here – http://aka.ms/acspreview.
- Client (Git or Open SSH) to generate RSA Keys
Setup Sequence
- Create SSH RSA Public Key
- Deploy Swarm ACS Template
- Explore Resources in Container Service
Create SSH RSA Public Key
I used Git Client on my Windows Laptop to create the SSH key pair.
# Use ssh-keygen to create RSA key pair
# id_rsa and id_rsa.pub files are created in ~/.ssh folder
ssh-keygen –t rsa –b 2048

Open id_rsa.pub file, which has three parts (ssh-rsa <key> user@machinename). We need to copy all these content and provide as the SSHRSAPUBLICKEY, while deploying the template for ACS.
Deploy Swarm ACS Template
Open Browser and navigate to https://github.com/rgardler/azure-quickstart-templates/tree/acs/acs-swarm-full-template.
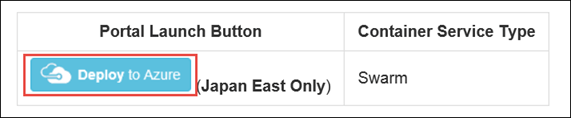
Click on Deploy to Azure button.
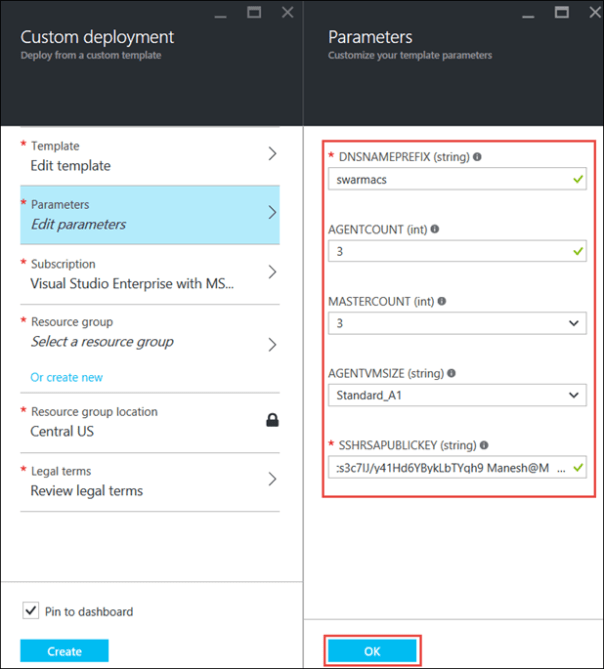
Provide parameter values for the custom deployment and click OK.
- DNSNAMEPREFIX: Unique DNS prefix
- AGENTCOUNT: You can choose 1 through 40. Provide 3.
- MASTERCOUNT: 1, 3 or 5 are allowed now. Choose 3.
- AGENTVMSIZE: For experiments, choose lower size (helps with reduced cost)
- SSHRSAPUBLICKEY: Ensure that you copy all the three parts created in previous step and provide here.
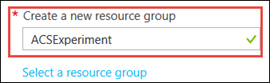
Choose to Create a new Resource Group, name it ACSExperiment.
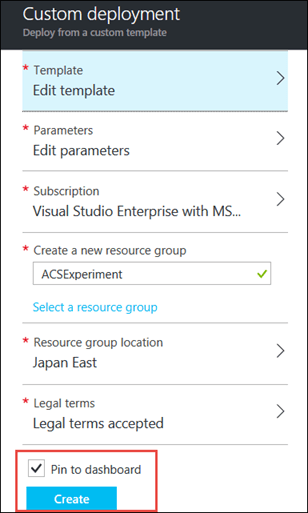
Ensure that you choose Japan East
as the resource group location as this is the only supported region for ACS now.

Click on Legal Terms, review the terms and click Create.
Click on Create from the custom deployment blade.
Wait for the deployment to complete.
Explore Resources in Container Service
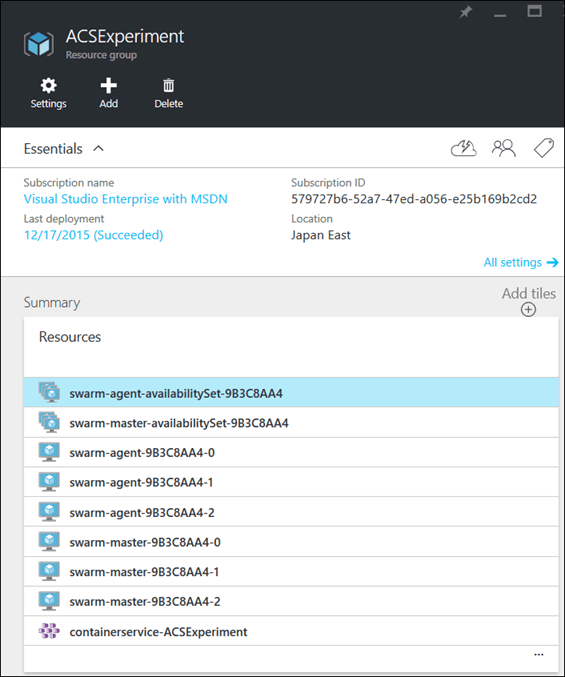
Once the template deployment is complete, open the Resource Group, ACSExperiment. You can see that there are four categories of resources.
- Azure Container Service Resource – Which manages all other resources
- A number of agent nodes with in an availability set for agents
- A number of master nodes with in an availability set for masters
- Availability set (one for agents and another for master)
In the next article, I will be going through in-detail on exploring the above resources, followed by publishing apps to Swarm cluster. J
Setup Jenkins Job to start on Git Commit
This is the fifth post in the series of ‘Continuous Integration and Delivery with Docker Trusted Registry on Microsoft Azure’. This is a step by step guidance for implementing http://www.docker.com/sites/default/files/UseCase/RA_CI%20with%20Docker_08.25.2015.pdf on Microsoft Azure.
You can read the previous post in this series at https://manesh.me/2015/11/15/continuous-integration-and-delivery-with-docker-trusted-registry-on-microsoft-azure/. In the previous post, we have created a job in Jenkins to have on-demand start based on Git source repository. In this post, we will explore, how we can setup Git/Jenkins to work together to invoke the job for every check-in. To configure and try out this post, you will need write permission to Git repository. I am using a forked repository https://github.com/Manesh-R/hello-jenkins, for this post.
Prerequisites
- Microsoft Azure Subscription
- Followed steps in all prior posts
- Write permission on Git repository (Forking the Git project will be the easiest way)
Setup Sequence
- Configure GitHub Service Hook
- Configure Build Trigger on Git Commit
- Test build trigger with a commit to Git repository
Configure GitHub Service Hook
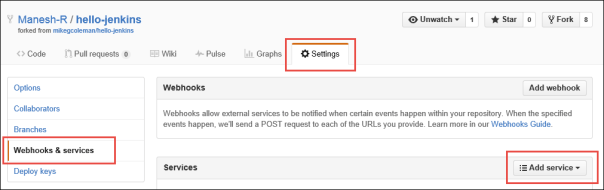
Open browser and navigate to your GitHub repository (https://github.com/Manesh-R/hello-jenkins). Note that you need admin permissions on the repository.
Click on Settings, then Webhooks & services and then Add service
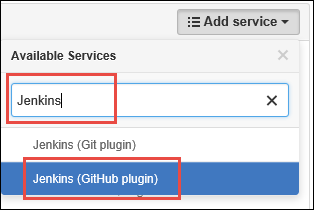
Search for Jenkins and click on Jenkins (GitHub plugin)
Update Jenkins hook URL, keep service Active and click Add service.
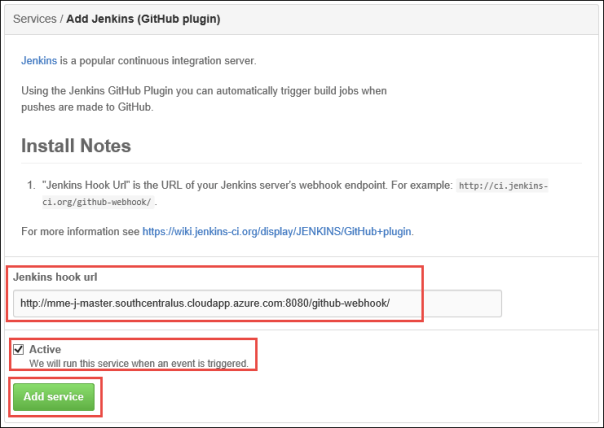
Now for every commit to the repository, service hook will send notification to Jenkins.
Configure Build Trigger on Git commit
Open browser and navigate to http://mme-j-master.southcentralus.cloudapp.azure.com:8080/
Click on job dtr-cicd.

Click on Configure
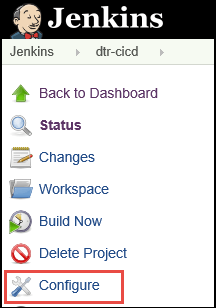
In project details select Build when a change is pushed to GitHub in Build Triggers and click Save.

Test build trigger with a commit to Git repository
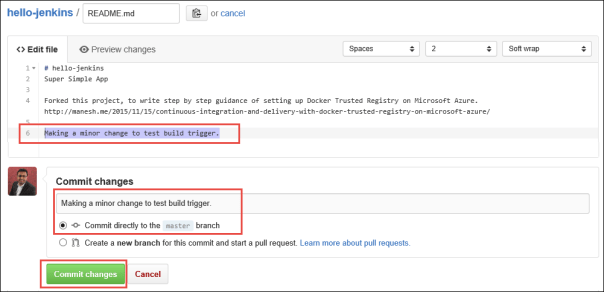
Open browser and navigate to https://github.com/Manesh-R/hello-jenkins/edit/master/README.md
Make a minor modification to the file content and commit changes directly to master.
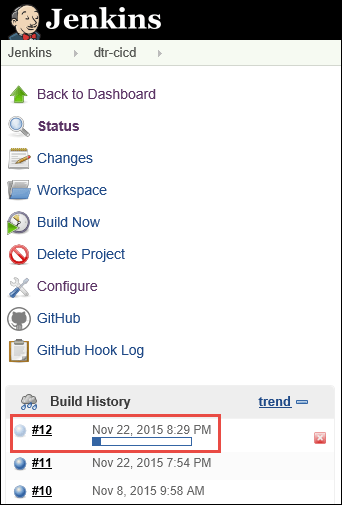
Now you should see a build automatically triggering on Jenkins server based on the service hook notification. J
Summary
With this we have gone through the complete cycle of setting up a continuous integration / delivery pipeline using Docker & Jenkins on Microsoft Azure. If you have any questions, add a comment to the posts. Also, if you are interested in getting notified for new blog posts, follow me on Twitter – http://www.twitter.com/ManeshRavendran.
Setup Jenkins Job with Git Source
This is the fourth post in the series of ‘Continuous Integration and Delivery with Docker Trusted Registry on Microsoft Azure’. This is a step by step guidance for implementing http://www.docker.com/sites/default/files/UseCase/RA_CI%20with%20Docker_08.25.2015.pdf on Microsoft Azure.
You can read the previous post in this series at https://manesh.me/2015/11/20/setup-jenkins-slave-on-microsoft-azure-for-cicd-with-dtr/. You can find all posts in this series at https://manesh.me/2015/11/15/continuous-integration-and-delivery-with-docker-trusted-registry-on-microsoft-azure/.
Prerequisites
- Microsoft Azure Subscription
Setup Sequence
- Install and Configure GitHub plugin
- Setup Build Job
Install and Configure GitHub plugin
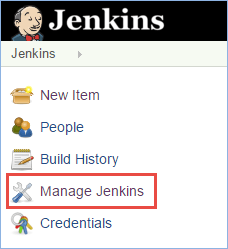
Open browser and navigate to http://mme-j-master.southcentralus.cloudapp.azure.com:8080/
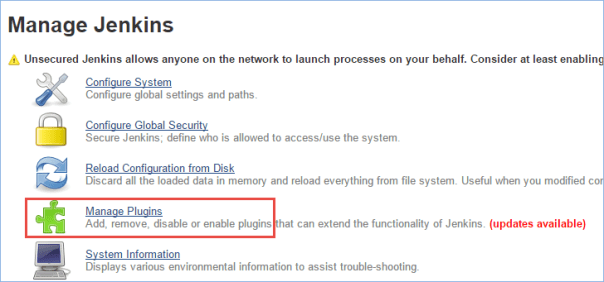
Click on Manage Jenkins
Click on Manage Plugins
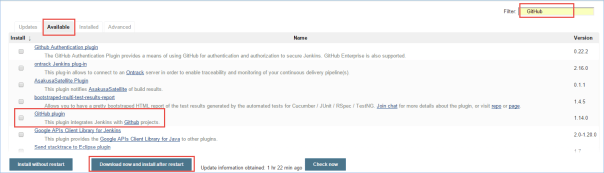
Click Available, type GitHub in the filter, choose GitHub Plugin from the results, and click Download now and install after restart
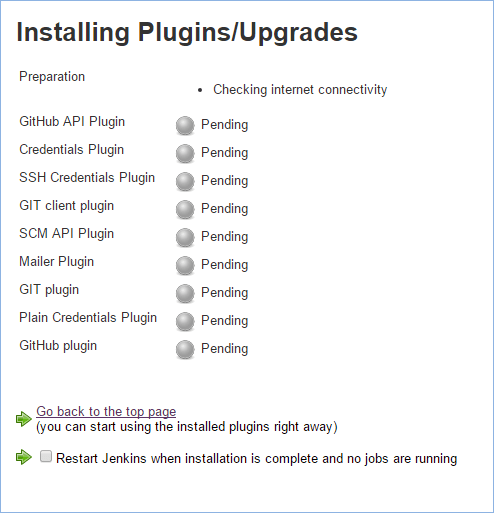
Wait for install and upgrade of plugins to be complete.
Setup Build Job
From Jenkins dashboard, click New Item, provide item name ‘dtr-cicd‘, choose Freestyle project and click OK

For the project details, provide following information and click Save
- GitHub Project: https://github.com/mikegcoleman/hello-jenkins/
-
Restrict where this project can be run (Choose this option and provide docker as label expression)
- docker
- Source Code Management: Git
- Repository URL: https://github.com/mikegcoleman/hello-jenkins.git
-
Build > Add Build Step > Execute Shell
#build docker image
sudo docker build –pull=true -t mme-dtr.southcentralus.cloudapp.azure.com/hello-jenkins:$GIT_COMMIT .
#test docker image
sudo docker run -i –rm mme-dtr.southcentralus.cloudapp.azure.com/hello-jenkins:$GIT_COMMIT ./script/test
#push docker image
sudo docker push mme-dtr.southcentralus.cloudapp.azure.com/hello-jenkins:$GIT_COMMIT
Click on Build Now from the job page.
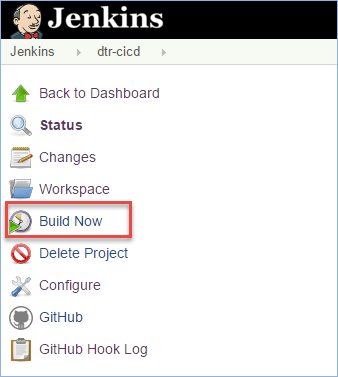
You should see that project builds successfully. J
Note: You can configure build schedule to be initiated when a change is pushed to GitHub.
Setup Jenkins Slave on Microsoft Azure for CICD with DTR
This is the third post in the series of ‘Continuous Integration and Delivery with Docker Trusted Registry on Microsoft Azure’. This is a step by step guidance for implementing http://www.docker.com/sites/default/files/UseCase/RA_CI%20with%20Docker_08.25.2015.pdf on Microsoft Azure.
You can read the previous post in this series at https://manesh.me/2015/11/15/continuous-integration-and-delivery-with-docker-trusted-registry-on-microsoft-azure/.
Prerequisites
- Microsoft Azure Subscription
Setup Sequence
- Create virtual machine for Jenkins Slave
- Assign DNS name for Jenkins Slave machine
- Install JRE on Jenkins Slave
- Install and Configure Docker Engine on Jenkins Slave
- Register slave node in Jenkins Master
Create virtual machine for Jenkins Slave
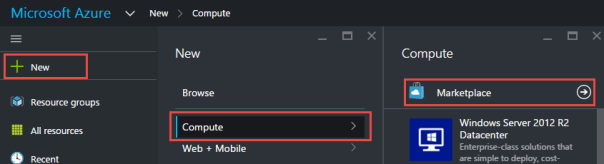
Open browser and navigate to https://portal.azure.com/

From Azure Portal, click New, then Compute, then Marketplace
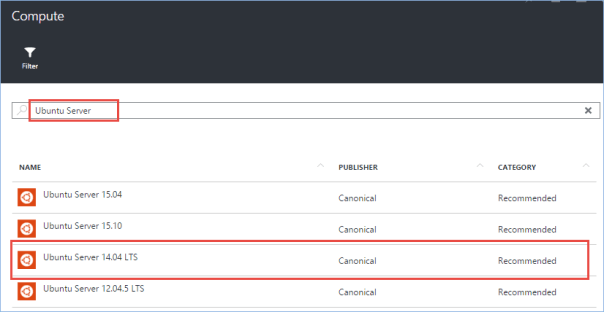
Type Ubuntu Server in the search box and press Enter, then click on ‘Ubuntu Server 14‘ from the search results
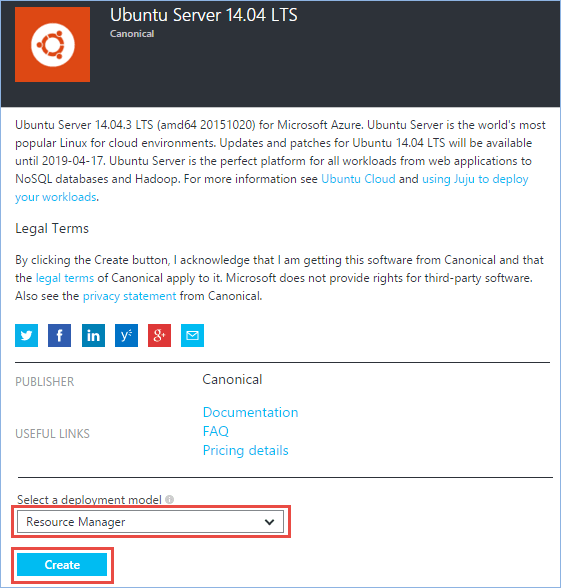
Read virtual machine image description, choose Resource Manager as the deployment model and click Create
Note: It is important to choose ‘Resource Manager’ deployment model, to have this created in the same resource group of DTR and Jenkins Master.
Provide basic configuration details for the virtual machine (you can change details as per your environment) and click OK
- Name: mme-j-slave01
- User name: cicdagent
- Authentication Type: Password
- Password: Azure101!
-
Resource Group: DTR
- Select existing Resource Group, you created for DTR virtual machine
- Location: South Central US

For size configuration, choose D1 Standard and click Select

Choose default values for optional configurations, and click OK
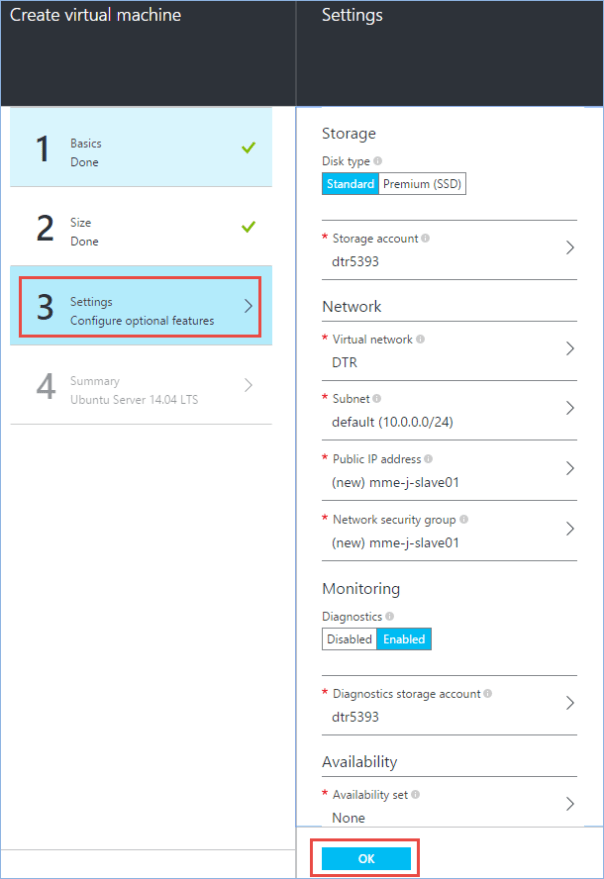
Review summary details and click OK
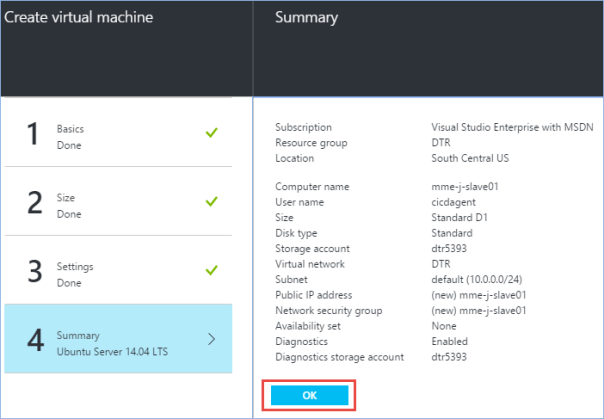
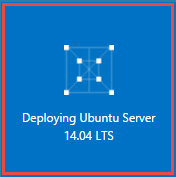
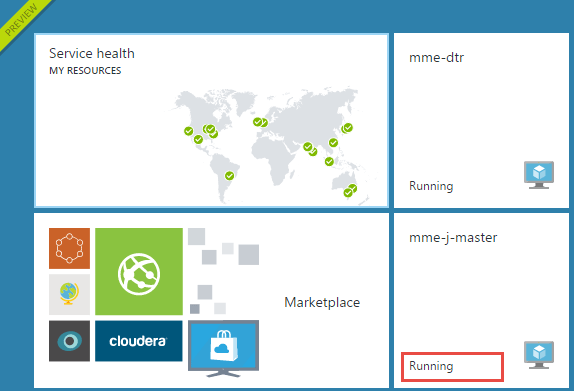
Wait for virtual machine to get into state ‘Running’.
Assign DNS Name for Jenkins Slave
Follow the similar steps in previous post to create a DNS name label for the virtual machine. In my environment FQDN of the virtual machine is mme-j-slave01.southcentralus.cloudapp.azure.com
Install JRE on Jenkins Slave
Use SSH to connect to Jenkins Slave machine and execute the following commands.
ssh cicdagent@mme-j-slave01.southcentralus.cloudapp.azure.com
# install jre package on the virutal machine
sudo apt-get install default-jre
Install and Configure Docker Engine on Jenkins Slave
Use SSH to connect to Jenkins Slave machine and execute the following commands.
ssh cicdagent@mme-j-slave01.southcentralus.cloudapp.azure.com
# download and install CS Engine
curl -s https://packagecloud.io/install/repositories/Docker/cs-public/script.deb.sh | sudo bash
sudo apt-get install docker-engine-cs
Since we do not have a valid SSL certificate on Docker Trusted Registry server for HTTPS, we need to ensure that docker service starts with ‘–insecure-registry mme-dtr.southcentralus.cloudapp.azure.com’ option. For this we need to edit /etc/default/docker file.
You can use vim editor to make required changes on the file. To start inserting text in vim, press the ‘i’ key to enter insert mode. When you have finished editing, press ESC to exit insert mode, then type ‘:wq’ to save and exit the editor.
sudo vim /etc/default/docker

Once the file is updated, reboot the Jenkins Slave virtual machine.
sudo reboot
Register slave node in Jenkins Master
Open browser and navigate to http://mme-j-master.southcentralus.cloudapp.azure.com:8080

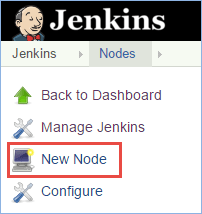
Click on Manage Jenkins

Click on Manage Nodes

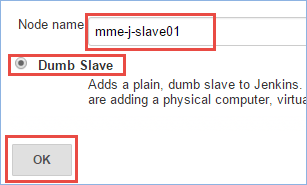
Click on New Node
Enter mme-j-slave01 as the node name, choose option dump slave and click OK
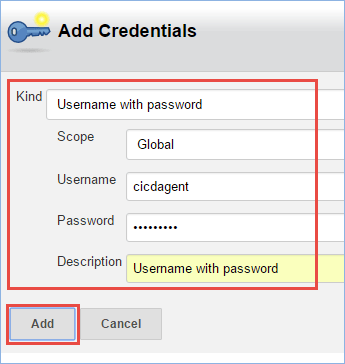
On node details page, provide slave node information. Click on Add button for credentials and create a username with password credential. It is important to keep label for node as docker. This label is used later to associate Jenkins Job to the slave node.

You should see that the node is added and is in active state.

Next Blog
You can read the next post in this blog series here, <TODO>.
Setup Jenkins Master on Microsoft Azure for CICD with DTR
This is the second post in the series of ‘Continuous Integration and Delivery with Docker Trusted Registry on Microsoft Azure’. This is a step by step guidance for implementing http://www.docker.com/sites/default/files/UseCase/RA_CI%20with%20Docker_08.25.2015.pdf on Microsoft Azure.
You can read all the posts in this series at https://manesh.me/2015/11/15/continuous-integration-and-delivery-with-docker-trusted-registry-on-microsoft-azure/.
Prerequisites
- Microsoft Azure Subscription
Setup Sequence
- Create virtual machine for Jenkins Master
- Assign DNS name for Jenkins Master virtual machine
Create virtual machine for Jenkins Master
Open browser and navigate to https://portal.azure.com/

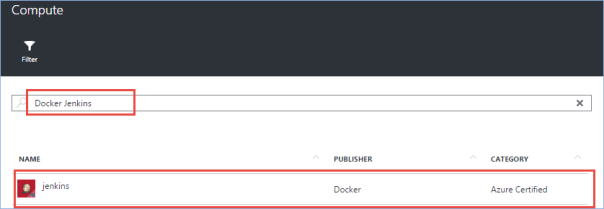
From Azure Portal, click New, then Compute, then Marketplace

Type Docker Jenkins in the search box and press Enter, then click on ‘Jenkins‘ from publisher ‘Docker‘ in the search results
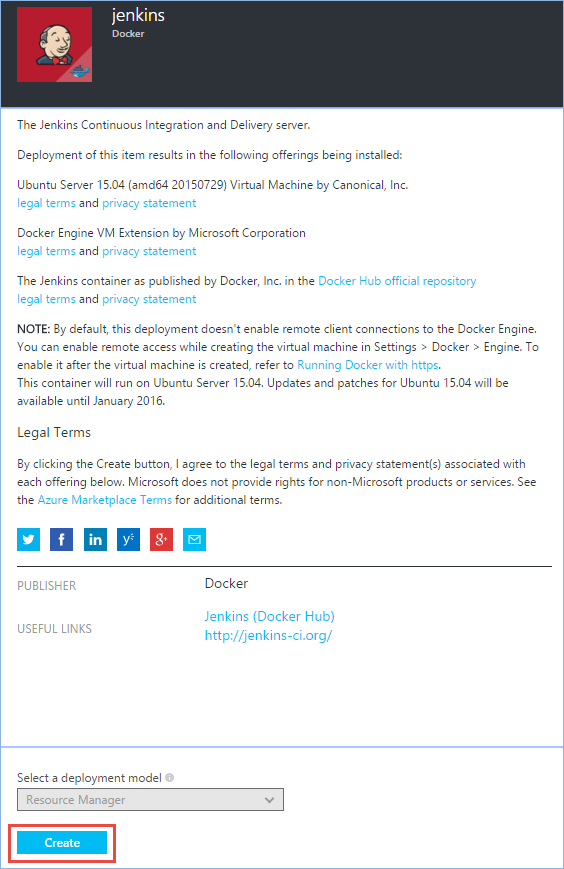
Read virtual machine image description and click on Create
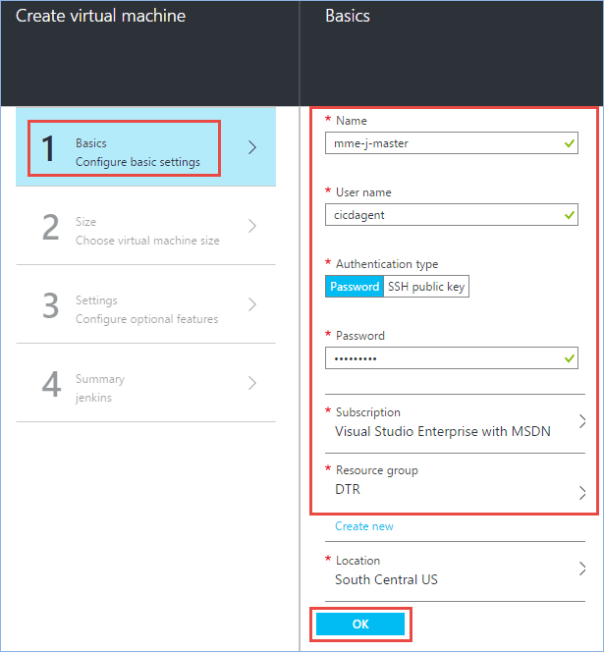
Provide basic configuration details for the virtual machine (you can change details as per your environment) and click OK
- Name: mme-j-master
- User name: cicdagent
- Authentication Type: Password
- Password: Azure101!
-
Resource Group: DTR
- Select existing Resource Group, you created for DTR virtual machine
- Location: South Central US
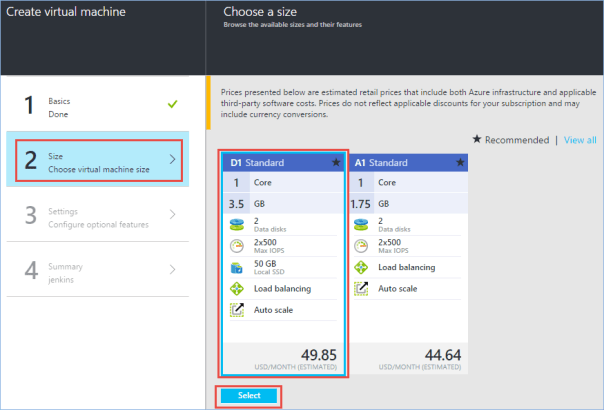
For size configuration, choose D1 Standard and click Select
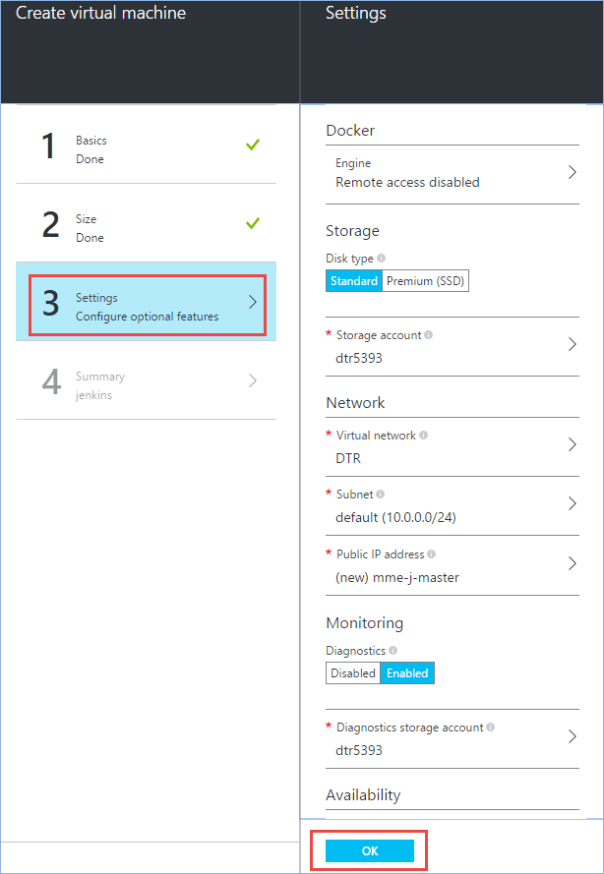
Choose the default Settings for ‘Configure optional features‘ and click OK
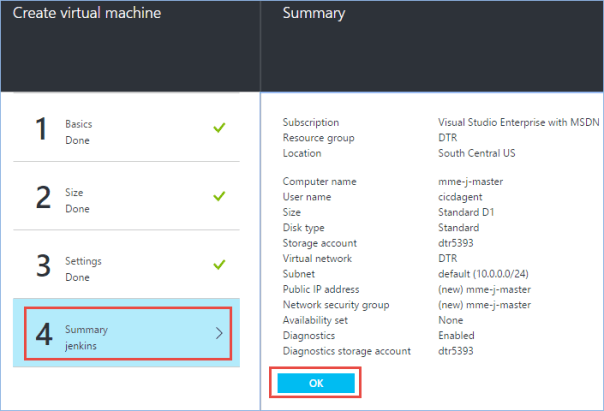
Review the summary details and click OK
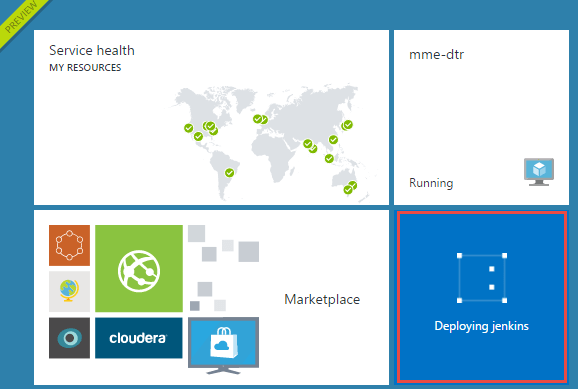
Initial virtual machine will show status as ‘Deploying‘, wait until it turns to ‘Running‘. I have seen it taking more than couple of minutes to deploy and configuring everything before getting into running state.
Assign DNS name for Jenkins Master virtual machine
Follow the similar steps in previous post to create a DNS name label for the virtual machine. In my environment FQDN of the virtual machine is mme-j-master.southcentralus.cloudapp.azure.com
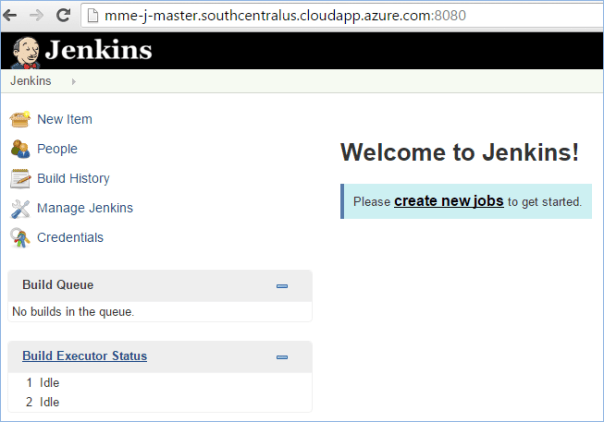
Once virtual machine is in running state and DNS name label is assigned, browse to
http://mme-j-master.southcentralus.cloudapp.azure.com:8080
Next Blog
You can read the next post in this blog series here, https://manesh.me/2015/11/20/setup-jenkins-slave-on-microsoft-azure-for-cicd-with-dtr/.
Setup Docker Trusted Registry on Microsoft Azure
This is the first post in the series of ‘Continuous Integration and Delivery with Docker Trusted Registry on Microsoft Azure’. This is a step by step guidance for implementing http://www.docker.com/sites/default/files/UseCase/RA_CI%20with%20Docker_08.25.2015.pdf on Microsoft Azure.
You can read all the posts in this series at https://manesh.me/2015/11/15/continuous-integration-and-delivery-with-docker-trusted-registry-on-microsoft-azure/.
Prerequisites
- Microsoft Azure Subscription
Setup Sequence
- Create virtual machine for Docker Trusted Registry
- Assign DNS name for DTR virtual machine
- Download DTR License from Docker Hub
- Update settings of DTR virtual machine
Create virtual machine for Docker Trusted Registry
Open browser and navigate to https://portal.azure.com/

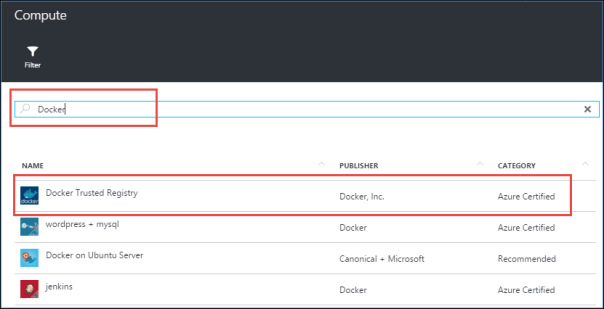
From Azure Portal, click New, then Compute, then Marketplace

Type Docker in the search box and press Enter, then click on ‘Docker Trusted Registry‘ from the search results
Read the description of marketplace virtual machine image for DTR and click Create
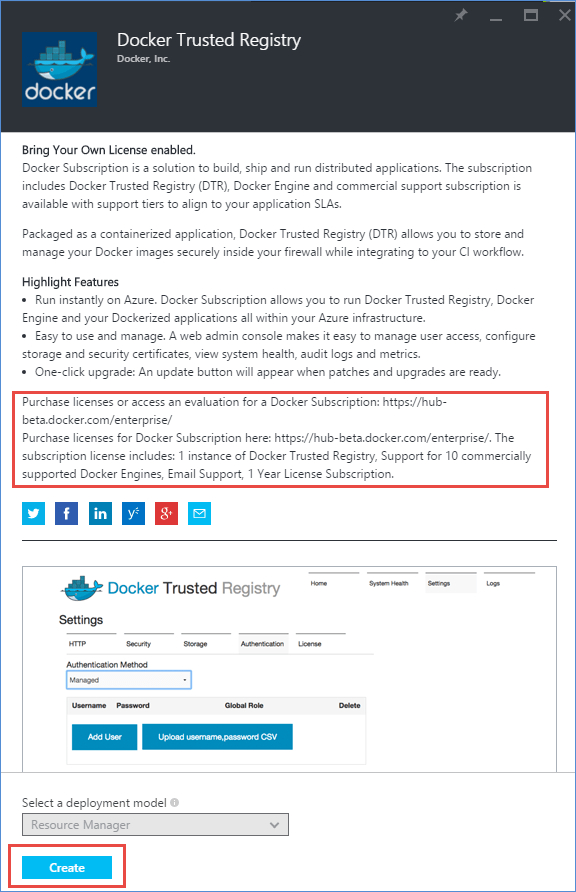
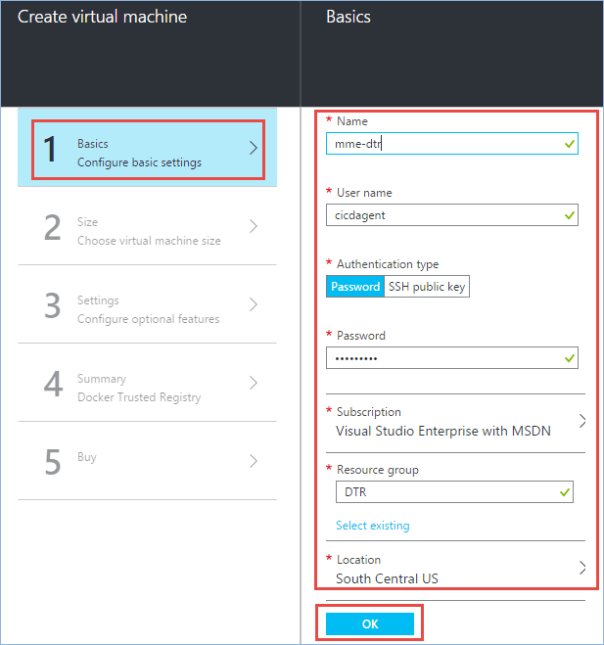
Provide basic configuration details for the virtual machine (you can change details as per your environment) and click OK
- Name: mme-dtr
- User name: cicdagent
- Authentication Type: Password
- Password: Azure101!
- Resource Group: DTR
- Location: South Central US
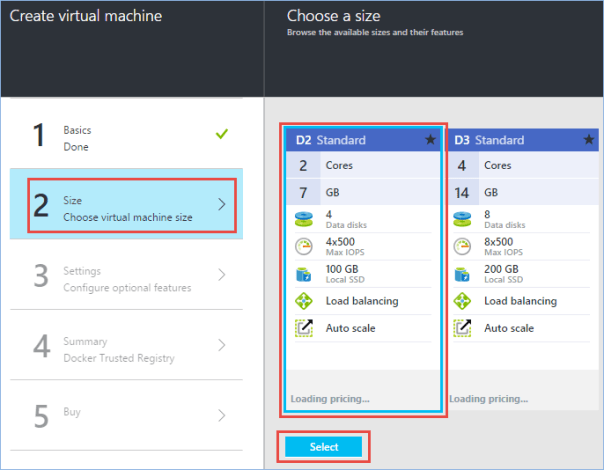
For size configuration details, choose D2 Standard and click Select
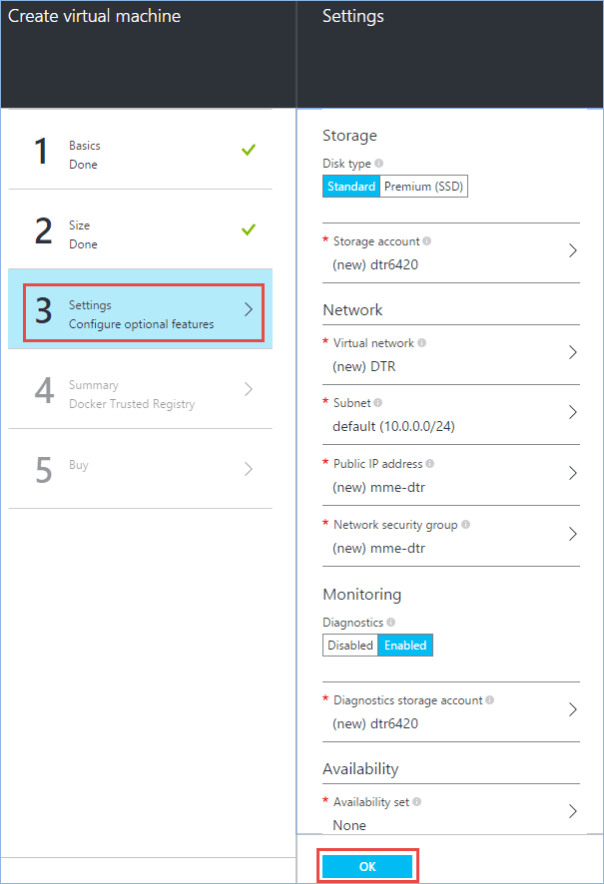
Choose default settings for optional features, and click OK
Review summary details and click OK
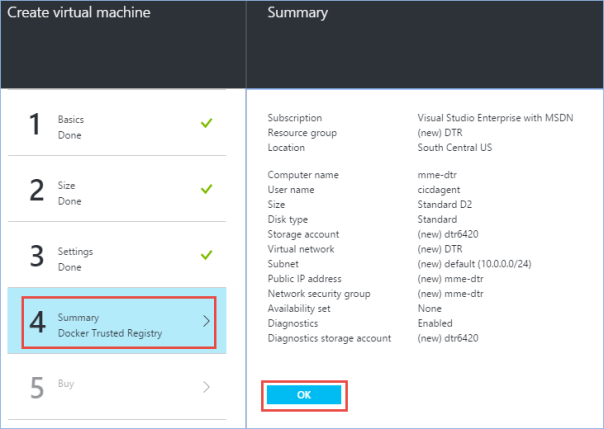
Review buy / offer details and click Purchase

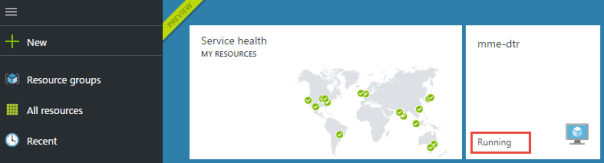
Now you will see that Docker Trusted Registry is Deploying. Wait for the virtual machine to be in Running state.

Assign DNS name for DTR virtual machine
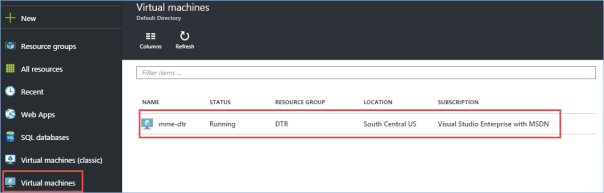
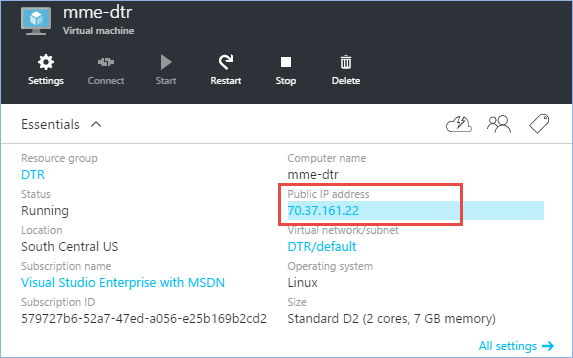
Click on Virtual Machines (remember, we created the virtual machine with Resource Manager as the deployment model) and click on mme-dtr
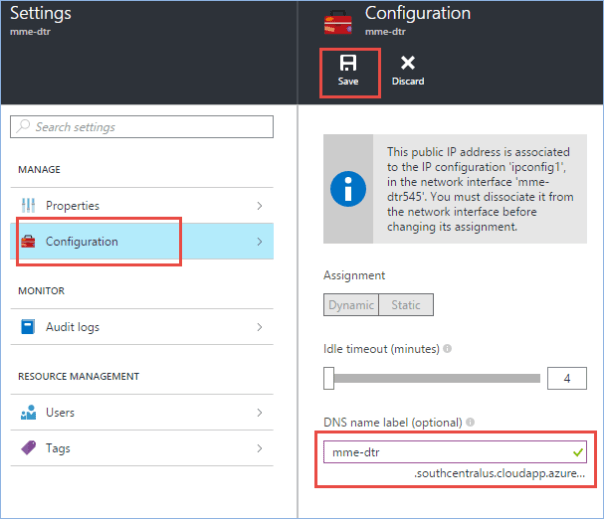
Click on Public IP Address
Click on Configuration, enter mme-dtr for DNS name label and click Save. Note that sometimes dns names might be already reserved by someone else, so choose different name if the default vm name is not available.
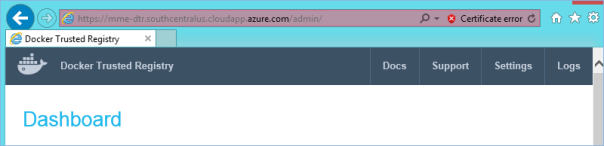
Ensure you can browse to the virtual machine with public DNS name. In this case it is https://mme-dtr.southcentralus.cloudapp.azure.com. Ignore the certificate error.
Download DTR License from Docker Hub
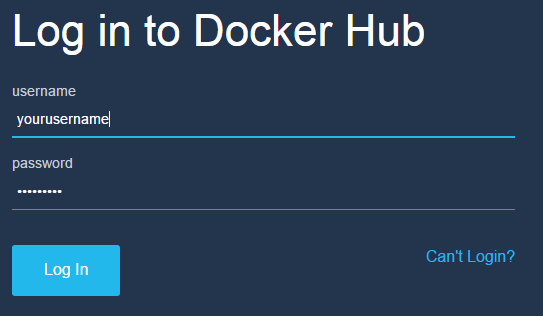
Open browser and navigate to https://hub-beta.docker.com/enterprise/

Login to the portal. If you do not have an account, sign up first and login to the portal.

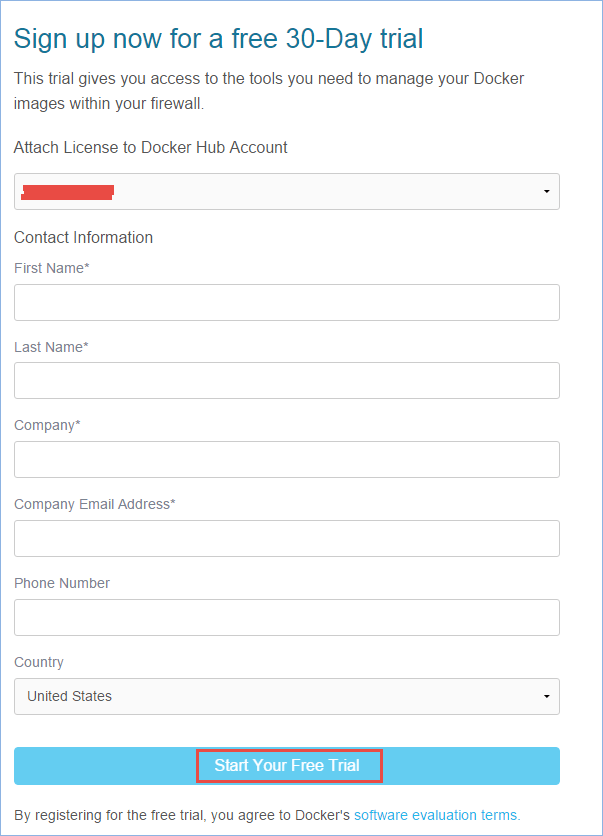
Once logged in, navigate to https://hub.docker.com/enterprise/ and click on Get Stated for Trial. Note that based on your requirement, you can choose other subscriptions as well. Also, however we started on hub-beta.docker.com, it redirects back to hub.docker.com

Private your contact information and click on ‘Start Your Free Trial’
Click on down arrow near your username, and click on Settings

Click on Licenses and then on Download icon
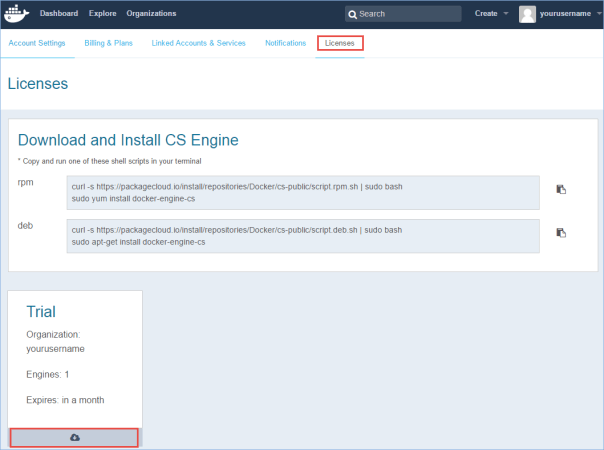
Save the downloaded docker_subscription.lic file in your local machine.
Update settings of DTR virtual machine
Open browser and navigate to https://mme-dtr.southcentralus.cloudapp.azure.com/admin/
Click on the warning shown on the dashboard page.

Provide fully qualified domain name and click Save and restart.
Note: I was not able to get the save button working properly on Internet Explorer. It worked well for me on Chrome. Also, server might take about 30 seconds to reboot.
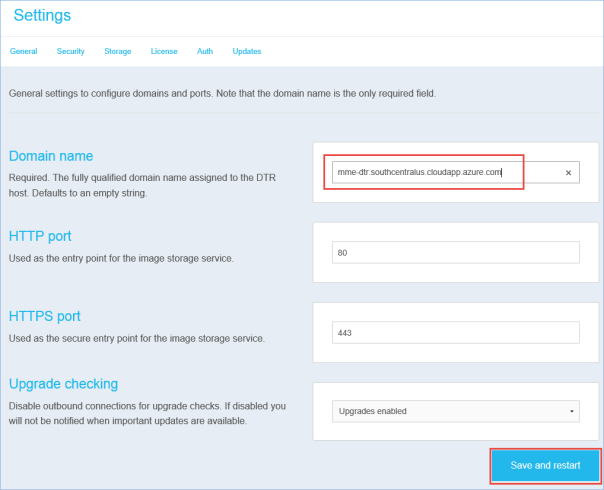
Wait for 30 seconds, refresh the browser and ensure that the ‘domain name missing‘ warning is no longer there.
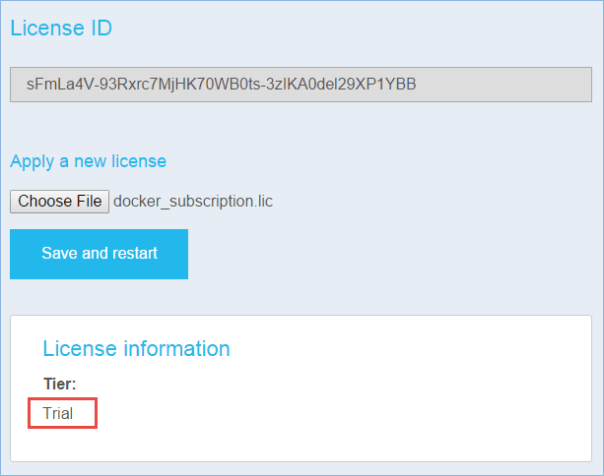
Click on the ‘Unlicensed copy’ warning message

Click on Choose File, select the downloaded license file from local machine and click on Save and restart

Once license is applied successfully, you should see the Tier getting updated to Trial
Next Blog
You can read the next post in this blog series here, https://manesh.me/2015/11/18/setup-jenkins-master-on-microsoft-azure-for-cicd-with-dtr/.
Continuous Integration and Delivery with Docker Trusted Registry on Microsoft Azure
Docker enables developers and sysadmins to build, ship and run distributed applications anywhere. Use cases are a great way to adopt technology to tackle specific technical or business challenges your team is trying to solve. Docker has provided guidance and a reference architecture for CI/CD with Docker. You can find it at http://www.docker.com/sites/default/files/UseCase/RA_CI%20with%20Docker_08.25.2015.pdf
In this series of blog posts, I will be exploring and implementing this RA fully on Microsoft Azure.
- Setup Docker Trusted Registry : https://manesh.me/2015/11/16/setup-docker-trusted-registry-on-microsoft-azure/
- Setup Jenkins Master : https://manesh.me/2015/11/18/setup-jenkins-master-on-microsoft-azure-for-cicd-with-dtr/
- Setup Jenkins Slave : https://manesh.me/2015/11/20/setup-jenkins-slave-on-microsoft-azure-for-cicd-with-dtr/
- Setup Jenkins Job with Git as the source : https://manesh.me/2015/11/23/setup-jenkins-job-with-git-source/
- Setup Jenkins Job to start on Git Commit : https://manesh.me/2015/11/25/setup-jenkins-job-to-start-on-git-commit/
You can download all the original word documents I used to author this blog series from https://gallery.technet.microsoft.com/Continuous-Integration-and-c5ecb6a8. If you have questions, you can add comments to this blog. If you liked my blog series, you can follow me on Twitter at https://www.twitter.com/ManeshRavendran/
