Blog Archives
Azure SQL Virtual Machine for Development and Testing
Though Microsoft Azure provides virtual machine images with SQL server installed, during development and testing, I may not need those optimizations. All I might need is a virtual machine with database engine installed. Also, from a cost standpoint, using an evaluation version of SQL server on a virtual machine might be preferred over a SQL VM image, for development and testing purposes. Providing how I prepare my SQL experiment virtual machine (most of the time, I use the machine for a week or two and once the experiment is complete, I delete the virtual machine).
Azure Virtual Machine Images with SQL

Build a Virtual Machine with SQL Database Engine
Step 1: Create a new ‘Windows Server 2012 R2 Datacenter’ virtual machine with required configuration. Once virtual machine is up and running continue with next steps.
Step 2: SQL Server requires .NET 3.5 to be installed on server. This is not installed by default on Azure virtual machines.
Install-WindowsFeature -Name NET-Framework-Core
Install-WindowsFeature -Name PowerShell-V2
Step 3: Download SQL server installer from an Azure storage account. You should run the following commands from Microsoft Azure PowerShell window.
CD C:\

$context = New-AzureStorageContext `
                -StorageAccountName '<todo>' `
                -StorageAccountKey '<todo>'

Get-AzureStorageBlobContent -Container '<todo>' `
                            -Context $context `
                            -Blob 'SQLServer2014-x64-ENU.iso'
Step 4: Mount downloaded ISO image to a drive
$sqlIso = "C:\SQLServer2014-x64-ENU.iso"

$sqlDrive = (Mount-DiskImage -ImagePath $sqlIso `
                            -PassThru `
                            -WarningAction Ignore |
                            Get-Volume).DriveLetter + ":"
Step 5: Silently install SQL Server from command line. For more details around command line based install check product documentation.
$domainName = Get-Content env:USERDOMAIN
$userName   = Get-Content env:USERNAME
$adminUser  = $domainName + "\" + $userName
$saPassword = "Secret@2015"

$installCommand = "$sqlDrive\Setup.exe /Q /IACCEPTSQLSERVERLICENSETERMS /ACTION=install /UpdateEnabled=0 /FEATURES=SQLENGINE,CONN,SSMS,ADV_SSMS /INSTANCENAME=MSSQLSERVER /SECURITYMODE=SQL /SAPWD=$saPassword /SQLSVCACCOUNT='NT Service\MSSQLSERVER' /SQLSYSADMINACCOUNTS=$adminUser"

Invoke-Expression $installCommand
Step 6: Once installation is complete, open SQL Management Studio and test with both Windows as well as SQL authentication.
Upload SQL installer to Storage
You can use the following script to upload SQL installer to blob storage for future use.
$context = New-AzureStorageContext `
                -StorageAccountName '<todo>' `
                -StorageAccountKey '<todo>'

Set-AzureStorageBlobContent `
			-Blob "SQLServer2014-x64-ENU.iso" `
			-Container '<todo>' `
			-File "SQLServer2014-x64-ENU.iso" `
			-Context $context `
			-Force
Cleaning up Azure Storage Accounts
I wanted to put some structure around the experiments that I was doing on Microsoft Azure. I noticed that I had lots and lots of storage accounts created in the past. I used to create new virtual machines from UI and shut it down whenever I am done with the required purposes. Whenever it shows me that I ran out of quota on cores or cloud services, I used to delete the virtual machine and cloud services. However, since most of the time, I used the option to create a new storage account as part of virtual machine creation, there were lot of storage accounts left out.
How do I go about finding which ones are still used vs. which ones are not in use. I can go through the portal click through each of the storage accounts, go to containers tab and look if there are files inside containers. But I thought it will be fun to write a PowerShell script that can traverse all storage accounts, containers and list the files and their sizes. If I see a storage account with no files, or storage account with only a ‘vhd’ container with couple of .status files only, then they are good to be delete.
Script Downloads
Getting started with Microsoft Azure PowerShell
I will be writing a series of blogs around Microsoft Azure & Hybrid Cloud. As a quick start, wanted to write up on how to setup our machines with PowerShell to work with Microsoft Azure.
Setup machine with Microsoft Azure PowerShell
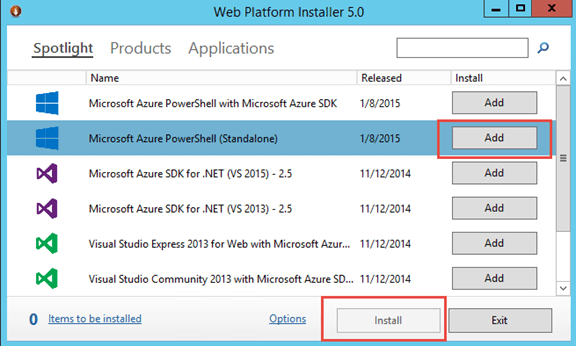
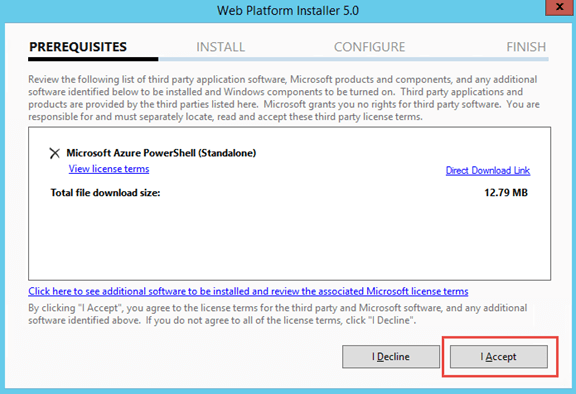
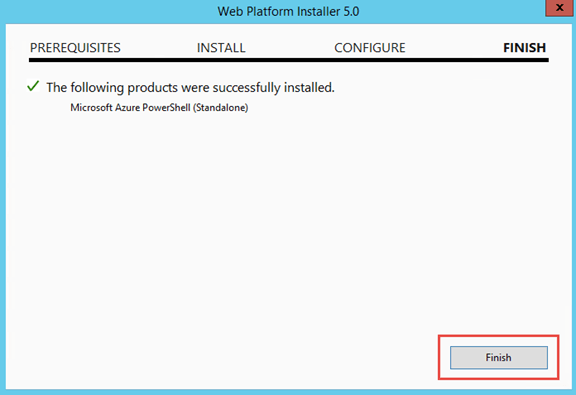
- If you haven’t installed Web Platform Installer, you can download and install it from http://www.microsoft.com/web/downloads/platform.aspx
- Download and install ‘Microsoft Azure PowerShell’ from Web Platform Installer. If you do not find that in ‘Spotlight’ you can perform a search for ‘Microsoft Azure PowerShell’
Set your default subscription and storage account
Download Azure Publish Settings file , configure default subscription and configure default storage account. There is a very good blog article from Michael Walsham explaining this step-by-step. I strongly recommend you read through that post. There is one minor change in Azure PowerShell cmdlet usage (based on a cmdlet update from Microsoft), from the post you see in the blog. I have written a PowerShell script with minor updates, which you can download from here.
Script Downloads
https://gist.github.com/Manesh-R/9ba344e08ebf7e6743a9
This file contains hidden or bidirectional Unicode text that may be interpreted or compiled differently than what appears below. To review, open the file in an editor that reveals hidden Unicode characters.
Learn more about bidirectional Unicode characters
| # Ref: https://manesh.me/2015/02/05/getting-started-with-microsoft-azure-powershell/ | |
| # Step 0: Define all variable values | |
| $publishSettingsFile = "C:\Users\Manesh\Documents\AzureSubscriptions.publishsettings"; | |
| $location = "West US"; | |
| $subscriptionName = "Visual Studio Premium with MSDN"; | |
| # Sometimes, you might have multiple MSDN subscriptions | |
| # If someone else add you as a co-admin on their MSDN subscription etc. | |
| # If so, choose the subscription Id option | |
| $subscriptionId = $null; | |
| # Sometimes, this account is created by someone else. | |
| # So if the script fails, you might want to change this. | |
| $storageAccountName = "manesh"; | |
| # Step 1: Import Azure Publish Settings File | |
| Import-AzurePublishSettingsFile $publishSettingsFile | |
| # Step 2: Set current subscription | |
| Get-AzureSubscription | |
| if ($subscriptionId -eq $null) { | |
| Select-AzureSubscription -SubscriptionName $subscriptionName -Current | |
| } else { | |
| Select-AzureSubscription -SubscriptionId $subscriptionId -Current | |
| } | |
| # Display only current subscription | |
| Get-AzureSubscription -Current | |
| # Step 3: Set current storage account | |
| $isStorageGood = $false; | |
| try { | |
| Get-AzureStorageAccount –StorageAccountName $storageAccountName -ErrorAction Stop | Out-Null | |
| if ((Get-AzureStorageAccount –StorageAccountName $storageAccountName).Location -eq $location) { | |
| $isStorageGood = $true; | |
| Write-Host "'$storageAccountName' storage account already exists, skipping creation" | |
| } else { | |
| Write-Host "'$storageAccountName' storage account already exists, but in a different location. Try another storage." | |
| } | |
| } | |
| catch { | |
| if (!(Test-AzureName -Storage $storageAccountName)) { | |
| Write-Host "Creating Storage Account $storageAccountName" | |
| New-AzureStorageAccount -StorageAccountName $storageAccountName -Location $location | |
| $isStorageGood = $true; | |
| } | |
| else { | |
| Write-Host "'$storageAccountName' storage account already exists and is owned by some other subscription. Try a different name." | |
| } | |
| } | |
| if ($isStorageGood) { | |
| if ($subscriptionId -eq $null) { | |
| Set-AzureSubscription -SubscriptionName $subscriptionName -CurrentStorageAccountName $storageAccountName | |
| } else { | |
| Set-AzureSubscription -SubscriptionId $subscriptionId -CurrentStorageAccountName $storageAccountName | |
| } | |
| # You should see the provided subscription and storage account name while executing following command | |
| Get-AzureSubscription -Current | |
| Write-Host "All is well" | |
| } else { | |
| Write-Host "Try a different storage account name and re-run the script" | |
| } |
.
