Global Azure Bootcamp – Redmond, WA
I am super excited about Global Azure Bootcamp, happening at Redmond, WA. Here are the details about the event.
Venue
Tahoma Conference Room, Microsoft Building 9 – 3350 157th Place NE, Redmond, WA
Event Date
April 16th – Saturday
Agenda
| 08:30 AM | Registration / Welcome | Manesh Raveendran (@ManeshRavendran) |
| 09:00 AM | Azure IaaS Fundamentals | Ram Prakash (@rprakashg) |
| 10:00 AM | Azure App Service | Andrew Westgarth (@apwestgarth) |
| 11:00 AM | Break | |
| 11:15 AM | Polyglot Persistence | David Makogon (@dmakogon) |
| 12:15 PM | Azure Marketplace | Vybava Ramadoss (@vybava) |
| 01:00 PM | Lunch Served | |
| 01:30 PM | Hands on Labs (Multiple Tracks)
IaaS or PaaS or Docker on Azure |
|
| 04:30 PM | Wrap up / Evaluations / Raffle** |
What you should bring?
You need to bring a computer for doing the hands-on labs. Labs will be executed on a virtual machine on Azure. So requirement for computer is to have remote desktop client. If you do not have an Azure Subscription, please sign up for a trial subscription before the event.
Signup for free Azure Subscription
If you already have an Azure subscription, you could use for the lab, you can skip this exercise. If you do not have an Azure subscription, follow the instructions provided below. You will be using this Azure subscription to complete all the labs in this course. If you have any questions about the free trial, checkout https://azure.microsoft.com/en-us/pricing/free-trial-faq/
- Launch a browser and navigate to https://azure.microsoft.com/en-us/pricing/free-trial/.
- Click on Try it now button and follow the instructions to sign up for a free trial.
See you at the venue. J
TechNet on Tour – Increasing efficiency and scalability with Windows Server 2016 and Microsoft cloud

Want to learn how to evolve your datacenter into a true hybrid cloud model to achieve greater efficiency, flexibility and scalability? If you are around Redmond, WA – sign up for free one-day training event – https://www.microsoftevents.com/profile/form/index.cfm?PKformID=0x111759537c
This training will cover:
- Confidently virtualize your mission critical workloads on premises with Hyper-V, and in the cloud with Microsoft Azure
- Implement new software-defined storage and network architectures to increase storage performance, flexibility and redundancy
- Get the smallest footprint, reduced patching, and most cloud-optimized OS performance available, with Nano Server
- Extend datacenter resources by using virtual networking to bridge the gap between your on-premises infrastructure and Microsoft Azure
- Explore single-click deployment of complex, multi-tier apps across VMs, storage, and networking with the new Azure Resource Manager
I will be delivering one of the sessions. See you there at the venue. J
Azure Gallery Image for SQL Server 2016 Release Candidate
With first release candidate for SQL Server 2016 is available – https://blogs.technet.microsoft.com/dataplatforminsider/2016/03/07/first-release-candidate-of-sql-server-2016-now-available/ – , how best and fast can we try it out? With the image for SQL Server 2016 RC0 available in Azure Gallery, it is easier to get started with it on an Azure Virtual Machine. You can search for SQL 2016 images in the gallery and create virtual machine from there.
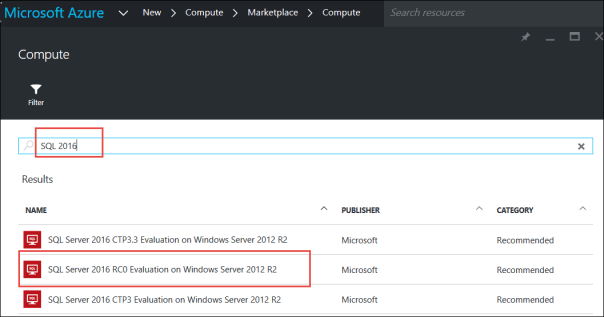
Today, we get multiple versions and editions – including Express – of SQL Server from Azure Image Gallery.
- SQL Server 2016 RC0 Evaluation on Windows Server 2012 R2
- SQL Server 2016 CTP3.3 Evaluation on Windows Server 2012 R2
- SQL Server 2016 CTP3 Evaluation on Windows Server 2012 R2
- SQL Server 2014 Web on Windows Server 2012 R2
- SQL Server 2014 Standard on Windows Server 2012 R2
- SQL Server 2014 SP1 Web on Windows Server 2012 R2
- SQL Server 2014 SP1 Standard on Windows Server 2012 R2
- SQL Server 2014 SP1 Express on Windows Server 2012 R2
- SQL Server 2014 SP1 Enterprise on Windows Server 2012 R2
- SQL Server 2014 Enterprise on Windows Server 2012 R2
- SQL Server 2012 SP2 Web on Windows Server 2012 R2
- SQL Server 2012 SP2 Web on Windows Server 2012
- SQL Server 2012 SP2 Standard on Windows Server 2012 R2
- SQL Server 2012 SP2 Standard on Windows Server 2012
- SQL Server 2012 SP2 Express on Windows Server 2012
- SQL Server 2012 SP2 Enterprise on Windows Server 2012 R2
- SQL Server 2012 SP2 Enterprise on Windows Server 2012
- SQL Server 2008 R2 SP3 Web on Windows Server 2008 R2
- SQL Server 2008 R2 SP3 Standard on Windows Server 2008 R2
- SQL Server 2008 R2 SP3 Express on Windows Server 2008 R2
- SQL Server 2008 R2 SP3 Enterprise on Windows Server 2008 R2
Next Steps
I found this article good – https://www.linkedin.com/pulse/ten-ways-sql-server-2016-change-way-we-do-things-kevin-chant?trk=hp-feed-article-title-like. Get started with SQL Server 2016 on Azure Virtual Machine, and also do follow various learning material made available at https://www.microsoft.com/en-us/server-cloud/data-driven.aspx
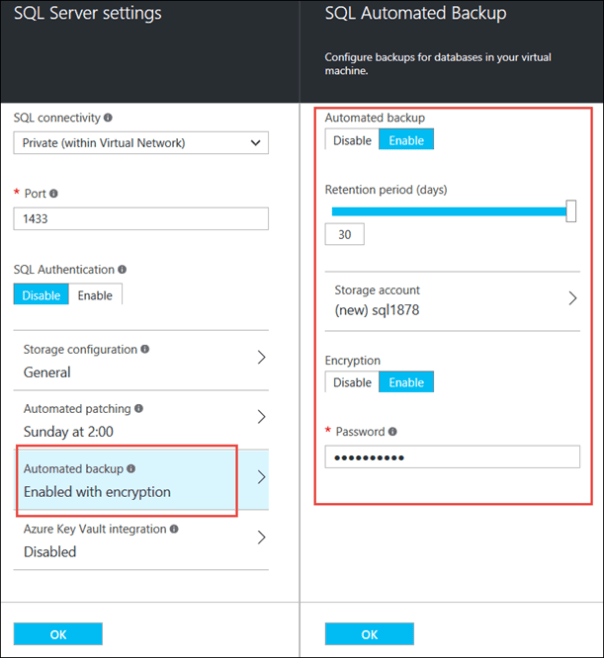
SQL Server on Azure Virtual Machine – More than a IaaS
I was doing a webinar last week about running SQL workloads on Azure Virtual Machine. An interesting topic of discussion was yes, when we think of virtual machine, it is purely Infrastructure as a Service (IaaS). However, when we think of running SQL Server on Azure Virtual Machine, we get a lot more capabilities / features that we would typically do not expect on IaaS offering.
Automated Patching
We can enable automated patching, both Windows & SQL Server patches, to be applied on the virtual machine once every day or once every week. We can also provide the patching time window for Azure to apply the patches.

Automated Backup
We can configure automated backup of SQL Server 2014 Enterprise and Standard virtual machines, to retain the backups for up to 30 days. We can optionally configure the backups to be encrypted.
Learn More
Read more from the official blog https://blogs.technet.microsoft.com/dataplatforminsider/2015/01/29/automated-backup-and-automated-patching-for-sql-server-in-azure-portal-and-powershell/.
Docker Swarm Cluster using Azure Container Services
Azure Container Service (ACS) is an Azure Compute resource provider to create and manage a cluster of virtual machines that act as container hosts together with a number of “master” machines that are used to orchestrate your application containers. Currently ACS is in preview, and my subscriptions got access to the preview service last week. I will be exploring ACS and blogging about them.
ACS works with Apache Mesos as well as Docker Swarm. In this article, I am sharing my experience on creating Docker Swarm cluster on ACS. For build the service, I used the guidance provided at https://github.com/rgardler/azure-quickstart-templates/blob/acs/acs-docs/101%20Creating%20a%20Service%20using%20the%20Portal.md as the primary reference.
Prerequisites
- Microsoft Azure Subscription enabled with ACS preview: If you need access, please request here – http://aka.ms/acspreview.
- Client (Git or Open SSH) to generate RSA Keys
Setup Sequence
- Create SSH RSA Public Key
- Deploy Swarm ACS Template
- Explore Resources in Container Service
Create SSH RSA Public Key
I used Git Client on my Windows Laptop to create the SSH key pair.
# Use ssh-keygen to create RSA key pair
# id_rsa and id_rsa.pub files are created in ~/.ssh folder
ssh-keygen –t rsa –b 2048

Open id_rsa.pub file, which has three parts (ssh-rsa <key> user@machinename). We need to copy all these content and provide as the SSHRSAPUBLICKEY, while deploying the template for ACS.
Deploy Swarm ACS Template
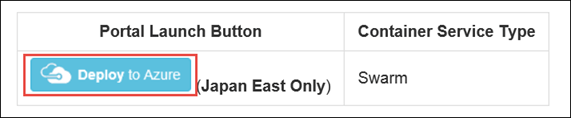
Open Browser and navigate to https://github.com/rgardler/azure-quickstart-templates/tree/acs/acs-swarm-full-template.
Click on Deploy to Azure button.
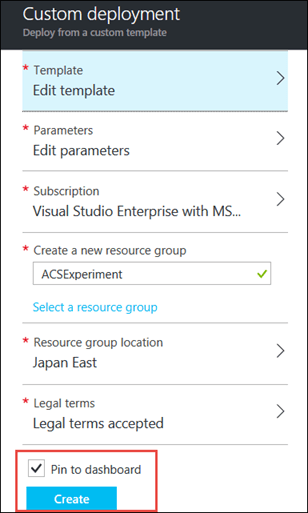
Provide parameter values for the custom deployment and click OK.
- DNSNAMEPREFIX: Unique DNS prefix
- AGENTCOUNT: You can choose 1 through 40. Provide 3.
- MASTERCOUNT: 1, 3 or 5 are allowed now. Choose 3.
- AGENTVMSIZE: For experiments, choose lower size (helps with reduced cost)
- SSHRSAPUBLICKEY: Ensure that you copy all the three parts created in previous step and provide here.
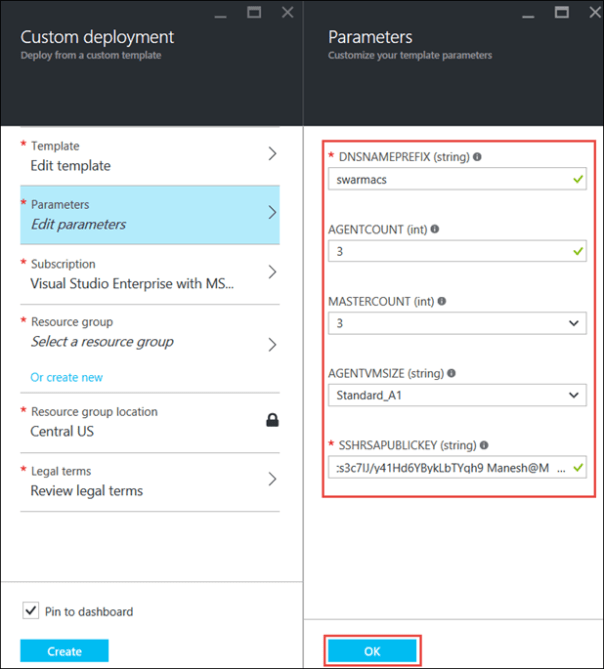
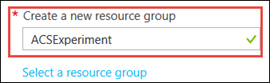
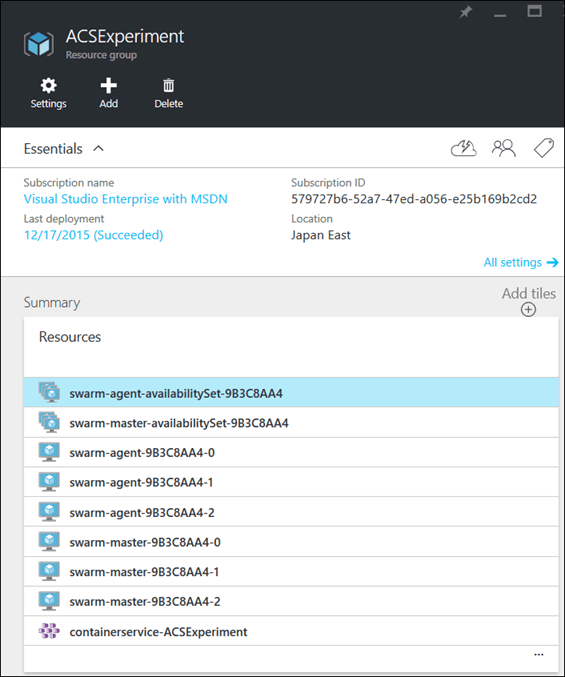
Choose to Create a new Resource Group, name it ACSExperiment.
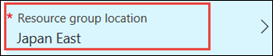
Ensure that you choose Japan East
as the resource group location as this is the only supported region for ACS now.
Click on Legal Terms, review the terms and click Create.
Click on Create from the custom deployment blade.
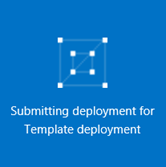
Wait for the deployment to complete.
Explore Resources in Container Service
Once the template deployment is complete, open the Resource Group, ACSExperiment. You can see that there are four categories of resources.
- Azure Container Service Resource – Which manages all other resources
- A number of agent nodes with in an availability set for agents
- A number of master nodes with in an availability set for masters
- Availability set (one for agents and another for master)
In the next article, I will be going through in-detail on exploring the above resources, followed by publishing apps to Swarm cluster. J
Microsoft Azure Training & Workshops to Solution Architects from various Global System Integrators
Last two weeks, I have travelled to Bangalore, India to provide trainings to Architects from various global system integrators on Microsoft Azure technology. During this travel, I have delivered sessions / workshops on the following:
-
Architecting Big Data & Analytics Solutions: The proliferation of customer data and the desire for insights not previously attainable has created a new industry focused on analyzing massive amounts of data. The cost of processing huge amounts of data does not need to be prohibitive when you can take advantage of a scalable cloud platform. We will discuss the Lambda architecture to take advantage of both batch and stream processing of data and will show various Azure services such as Azure Data Lake, Azure Data Factory, Azure Stream Analytics, Azure Machine Learning, and Power BI to provide a solution to unlock insights into data.
-
Architecting Modern Cloud Applications: Modern cloud applications offer end-user experiences and features that transcend traditional on-premises applications. For example, there are often multiple database technologies supporting today’s modern app. Embrace the notion of polyglot persistence and see how RDBMS’s, NoSQL databases, and caches can be combined to deliver robust end-user experiences. Modern cloud apps today are also expected to be reachable regardless of the platform or device. See how Azure’s App Service can be used to expand the reach of your solutions. Modern cloud apps are also not always just platform-as-a-service solutions. Learn about modern architecture patterns enabled by Azure that span infrastructure-as-a-service and platform-as-a-service deployments.
-
Architecting Global Scale Web and Mobile Solutions: One of the main benefits of the Microsoft Azure platform is its massive scale. Microsoft Azure runs on a massive network of over 19 regions worldwide. This global reach makes it possible to create solutions on a global scale that meet your demanding performance requirements. We will discuss architectural patterns that lend themselves to global geo-located solutions and the specific features of Microsoft Azure that enable geo-replicated data.
-
Dev Ops: Enterprise IT organizations are increasingly driven by business demands for faster, better solutions delivered more quickly than ever before. DevOps has emerged as a trend to help organizations evolve to better collaborate between development and operations teams for addressing these solution delivery challenges. While a DevOps transformation can take time to fully realize within an organization’s people and processes, there’s opportunities to accelerate the path towards DevOps by smartly leveraging cloud capabilities that can reduce infrastructure complexity, simplify release management, and support end-to-end application visibility through all stages of a solution’s lifecycle. This session will discuss the features in Microsoft Azure that help to realize this transformation and how the platform enables integration with existing assets.
- Case Study – Internet of Things (IoT)
- Case Study – Refactoring Multi-Tier Solutions
- Case Study – Lift and Shift
- Case Study – Identity and Access Management
- Case Study – Networking
Tips & Tricks for Configuring Laptop / Tablet for Presentation
During a recent Azure Trainings sessions, many of us ran into couple of issues while doing presentations. This article is about what we ran into and how we solved them.
-
Resolution of projector / monitor do not match the preferred resolution of laptop: Typically I work with 1920×1080 resolution or higher. However the maximum resolution supported by the projector was less than this. Before the sessions, changed resolution of my laptop to match the projector resolution, so that all screens get refreshed (including terminal server client) to the right resolution.
-
Duplicating the monitor gave issues: It is a very good feature to extend the monitor so that we can see speaker notes in our laptop, while projecting the slide show to attendees. However, this gave issues when we had to switch back to demo etc. I decided to turn off the extend feature and stick to duplicate monitor. Also, set properties in PPTX as following. Note that this may not be recommended, use only if you really need to do this.

-
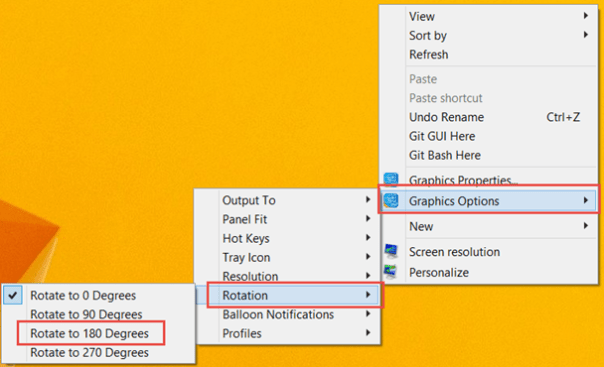
Automatic rotation of the laptop screen: I have a Windows 8.1 laptop with touch screen. It automatically goes for screen rotation (just like how Surface would do), when I tilt the laptop and sometime it doesn’t rotate back. I ran into this issue, just when I placed my laptop on the dais before the session. Had to do the following to recover from this:
-
Disable auto-rotation of screen: Open Screen Resolution window, uncheck Allow the screen to auto-rotate and click OK.

-
Rotate explicitly to get back to the required position: Right click on desktop and choose Graphics Options > Rotation > Rotate to x Degrees.
-
-
Code snippets were not viewable: Used ZoomIt – https://technet.microsoft.com/en-us/sysinternals/zoomit.aspx
If you have any feedback or other tips, please write it as a comments to this post. Thanks.
Setup Jenkins Job to start on Git Commit
This is the fifth post in the series of ‘Continuous Integration and Delivery with Docker Trusted Registry on Microsoft Azure’. This is a step by step guidance for implementing http://www.docker.com/sites/default/files/UseCase/RA_CI%20with%20Docker_08.25.2015.pdf on Microsoft Azure.
You can read the previous post in this series at https://manesh.me/2015/11/15/continuous-integration-and-delivery-with-docker-trusted-registry-on-microsoft-azure/. In the previous post, we have created a job in Jenkins to have on-demand start based on Git source repository. In this post, we will explore, how we can setup Git/Jenkins to work together to invoke the job for every check-in. To configure and try out this post, you will need write permission to Git repository. I am using a forked repository https://github.com/Manesh-R/hello-jenkins, for this post.
Prerequisites
- Microsoft Azure Subscription
- Followed steps in all prior posts
- Write permission on Git repository (Forking the Git project will be the easiest way)
Setup Sequence
- Configure GitHub Service Hook
- Configure Build Trigger on Git Commit
- Test build trigger with a commit to Git repository
Configure GitHub Service Hook
Open browser and navigate to your GitHub repository (https://github.com/Manesh-R/hello-jenkins). Note that you need admin permissions on the repository.
Click on Settings, then Webhooks & services and then Add service
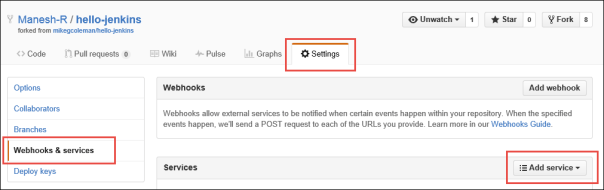
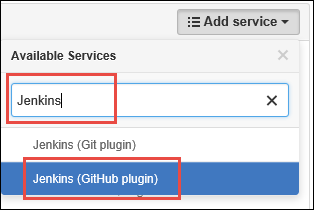
Search for Jenkins and click on Jenkins (GitHub plugin)
Update Jenkins hook URL, keep service Active and click Add service.
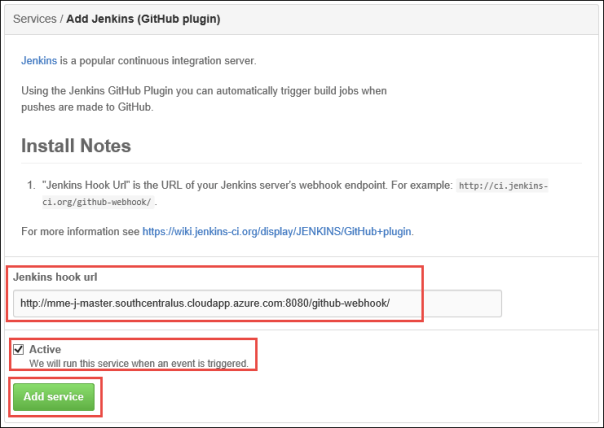
Now for every commit to the repository, service hook will send notification to Jenkins.
Configure Build Trigger on Git commit
Open browser and navigate to http://mme-j-master.southcentralus.cloudapp.azure.com:8080/
Click on job dtr-cicd.

Click on Configure
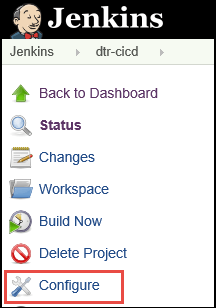
In project details select Build when a change is pushed to GitHub in Build Triggers and click Save.

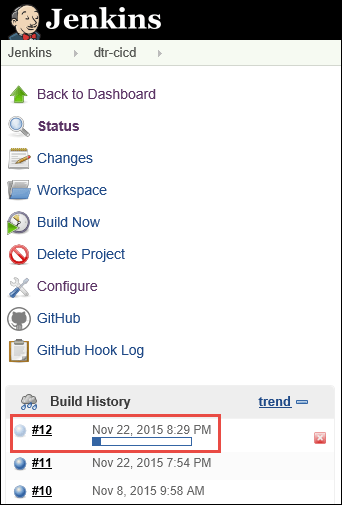
Test build trigger with a commit to Git repository
Open browser and navigate to https://github.com/Manesh-R/hello-jenkins/edit/master/README.md
Make a minor modification to the file content and commit changes directly to master.
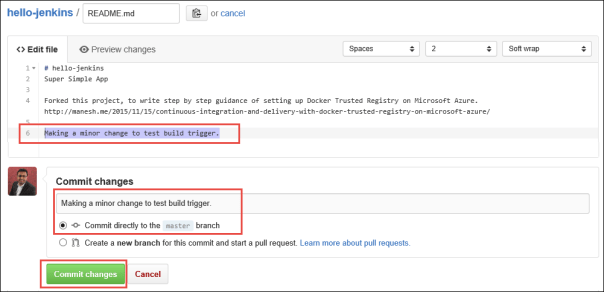
Now you should see a build automatically triggering on Jenkins server based on the service hook notification. J
Summary
With this we have gone through the complete cycle of setting up a continuous integration / delivery pipeline using Docker & Jenkins on Microsoft Azure. If you have any questions, add a comment to the posts. Also, if you are interested in getting notified for new blog posts, follow me on Twitter – http://www.twitter.com/ManeshRavendran.
Setup Jenkins Job with Git Source
This is the fourth post in the series of ‘Continuous Integration and Delivery with Docker Trusted Registry on Microsoft Azure’. This is a step by step guidance for implementing http://www.docker.com/sites/default/files/UseCase/RA_CI%20with%20Docker_08.25.2015.pdf on Microsoft Azure.
You can read the previous post in this series at https://manesh.me/2015/11/20/setup-jenkins-slave-on-microsoft-azure-for-cicd-with-dtr/. You can find all posts in this series at https://manesh.me/2015/11/15/continuous-integration-and-delivery-with-docker-trusted-registry-on-microsoft-azure/.
Prerequisites
- Microsoft Azure Subscription
Setup Sequence
- Install and Configure GitHub plugin
- Setup Build Job
Install and Configure GitHub plugin
Open browser and navigate to http://mme-j-master.southcentralus.cloudapp.azure.com:8080/
Click on Manage Jenkins
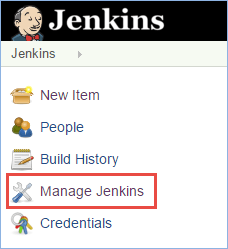
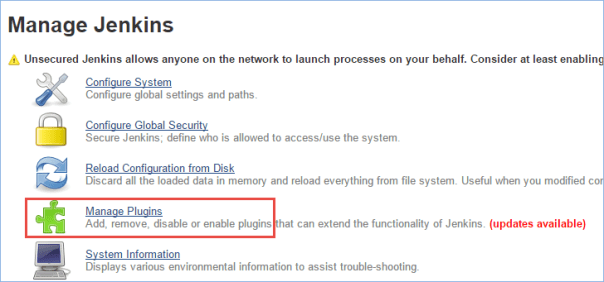
Click on Manage Plugins
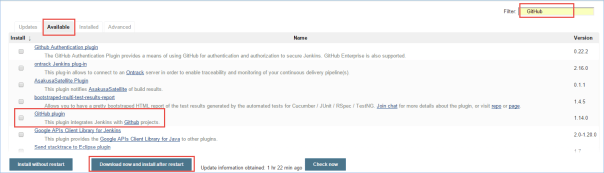
Click Available, type GitHub in the filter, choose GitHub Plugin from the results, and click Download now and install after restart
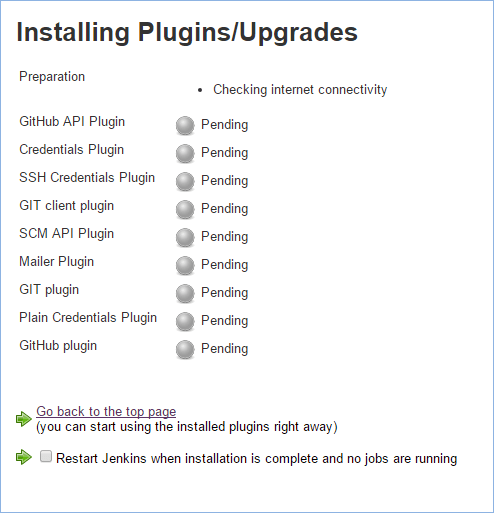
Wait for install and upgrade of plugins to be complete.
Setup Build Job
From Jenkins dashboard, click New Item, provide item name ‘dtr-cicd‘, choose Freestyle project and click OK

For the project details, provide following information and click Save
- GitHub Project: https://github.com/mikegcoleman/hello-jenkins/
-
Restrict where this project can be run (Choose this option and provide docker as label expression)
- docker
- Source Code Management: Git
- Repository URL: https://github.com/mikegcoleman/hello-jenkins.git
-
Build > Add Build Step > Execute Shell
#build docker image
sudo docker build –pull=true -t mme-dtr.southcentralus.cloudapp.azure.com/hello-jenkins:$GIT_COMMIT .
#test docker image
sudo docker run -i –rm mme-dtr.southcentralus.cloudapp.azure.com/hello-jenkins:$GIT_COMMIT ./script/test
#push docker image
sudo docker push mme-dtr.southcentralus.cloudapp.azure.com/hello-jenkins:$GIT_COMMIT
Click on Build Now from the job page.
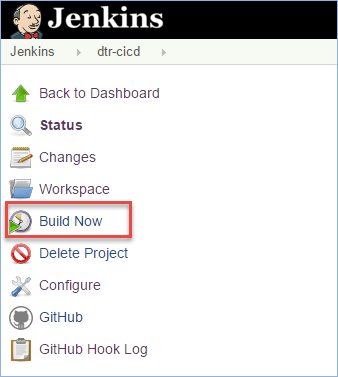
You should see that project builds successfully. J
Note: You can configure build schedule to be initiated when a change is pushed to GitHub.
Setup Jenkins Slave on Microsoft Azure for CICD with DTR
This is the third post in the series of ‘Continuous Integration and Delivery with Docker Trusted Registry on Microsoft Azure’. This is a step by step guidance for implementing http://www.docker.com/sites/default/files/UseCase/RA_CI%20with%20Docker_08.25.2015.pdf on Microsoft Azure.
You can read the previous post in this series at https://manesh.me/2015/11/15/continuous-integration-and-delivery-with-docker-trusted-registry-on-microsoft-azure/.
Prerequisites
- Microsoft Azure Subscription
Setup Sequence
- Create virtual machine for Jenkins Slave
- Assign DNS name for Jenkins Slave machine
- Install JRE on Jenkins Slave
- Install and Configure Docker Engine on Jenkins Slave
- Register slave node in Jenkins Master
Create virtual machine for Jenkins Slave
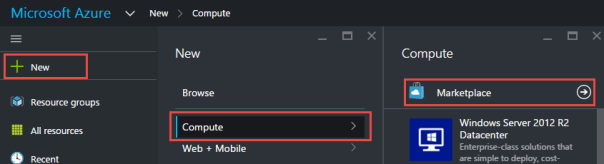
Open browser and navigate to https://portal.azure.com/

From Azure Portal, click New, then Compute, then Marketplace
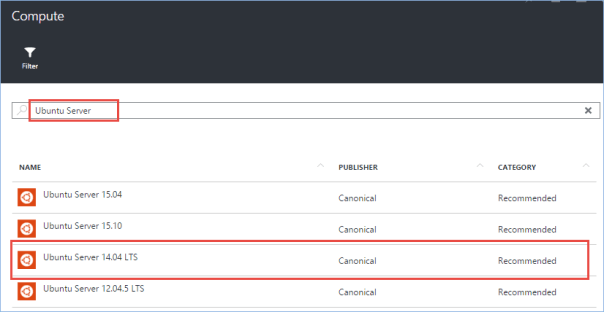
Type Ubuntu Server in the search box and press Enter, then click on ‘Ubuntu Server 14‘ from the search results
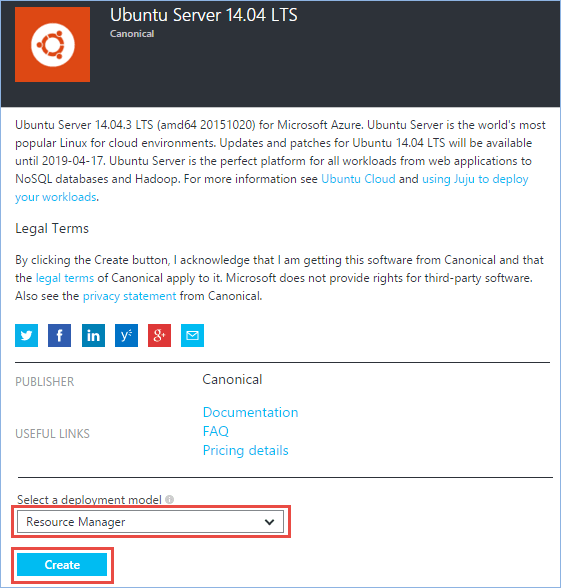
Read virtual machine image description, choose Resource Manager as the deployment model and click Create
Note: It is important to choose ‘Resource Manager’ deployment model, to have this created in the same resource group of DTR and Jenkins Master.
Provide basic configuration details for the virtual machine (you can change details as per your environment) and click OK
- Name: mme-j-slave01
- User name: cicdagent
- Authentication Type: Password
- Password: Azure101!
-
Resource Group: DTR
- Select existing Resource Group, you created for DTR virtual machine
- Location: South Central US

For size configuration, choose D1 Standard and click Select

Choose default values for optional configurations, and click OK
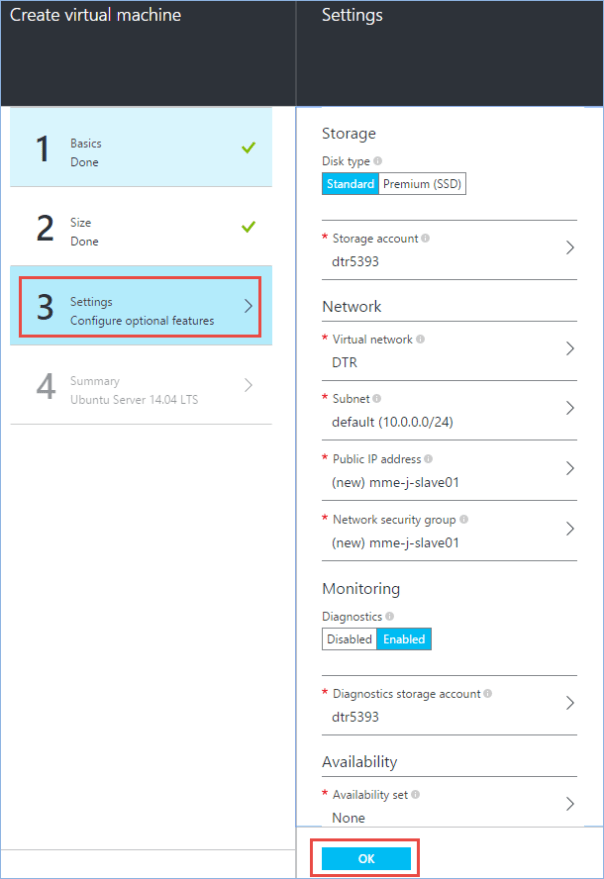
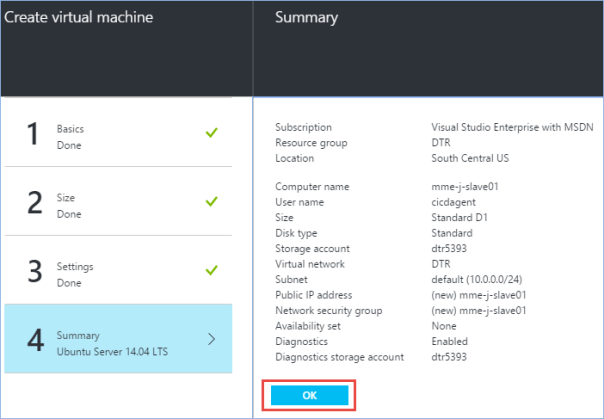
Review summary details and click OK
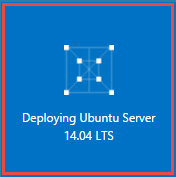
Wait for virtual machine to get into state ‘Running’.
Assign DNS Name for Jenkins Slave
Follow the similar steps in previous post to create a DNS name label for the virtual machine. In my environment FQDN of the virtual machine is mme-j-slave01.southcentralus.cloudapp.azure.com
Install JRE on Jenkins Slave
Use SSH to connect to Jenkins Slave machine and execute the following commands.
ssh cicdagent@mme-j-slave01.southcentralus.cloudapp.azure.com
# install jre package on the virutal machine
sudo apt-get install default-jre
Install and Configure Docker Engine on Jenkins Slave
Use SSH to connect to Jenkins Slave machine and execute the following commands.
ssh cicdagent@mme-j-slave01.southcentralus.cloudapp.azure.com
# download and install CS Engine
curl -s https://packagecloud.io/install/repositories/Docker/cs-public/script.deb.sh | sudo bash
sudo apt-get install docker-engine-cs
Since we do not have a valid SSL certificate on Docker Trusted Registry server for HTTPS, we need to ensure that docker service starts with ‘–insecure-registry mme-dtr.southcentralus.cloudapp.azure.com’ option. For this we need to edit /etc/default/docker file.
You can use vim editor to make required changes on the file. To start inserting text in vim, press the ‘i’ key to enter insert mode. When you have finished editing, press ESC to exit insert mode, then type ‘:wq’ to save and exit the editor.
sudo vim /etc/default/docker

Once the file is updated, reboot the Jenkins Slave virtual machine.
sudo reboot
Register slave node in Jenkins Master
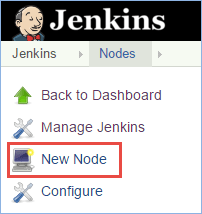
Open browser and navigate to http://mme-j-master.southcentralus.cloudapp.azure.com:8080

Click on Manage Jenkins

Click on Manage Nodes

Click on New Node
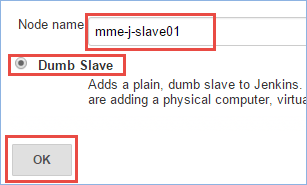
Enter mme-j-slave01 as the node name, choose option dump slave and click OK
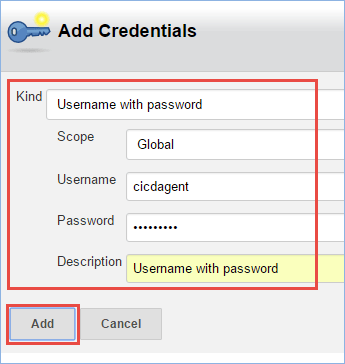
On node details page, provide slave node information. Click on Add button for credentials and create a username with password credential. It is important to keep label for node as docker. This label is used later to associate Jenkins Job to the slave node.

You should see that the node is added and is in active state.

Next Blog
You can read the next post in this blog series here, <TODO>.
