Writing cookbook on Microsoft Azure
This is the fourth post in the Chef and Microsoft Azure blog series. You can read the previous ones at:
- https://manesh.me/2015/10/17/setup-chef-workstation-on-microsoft-azure/
- https://manesh.me/2015/10/19/setup-chef-server-on-microsoft-azure/
- https://manesh.me/2015/10/20/setup-chef-node-on-microsoft-azure/
Writing cookbook is similar to how you would write it on other infrastructure. To get started with cookbook on Azure, I am exploring a cookbook to setup apache web server and show home page. Also, this will show you how to upload cookbook to the Chef Server, and set the run list for Chef Node via knife. This blog focus on getting your first cookbook on Azure. This do not go into details of cookbook components, if you would like to learn more about that refer https://docs.chef.io/cookbooks.html and https://learn.chef.io/manage-a-web-app/ubuntu/
Prerequisites
- Microsoft Azure Subscription
- Have gone through previous three posts in the series
Setup Sequence
- Create cookbook on workstation
- Upload cookbook to server
- Add cookbook to run list of node
- Run chef-client on node
- Enable endpoint using Azure CLI
Create cookbook on Workstation
Execute the following commands from the workstation.
# move to home directory
cd
# move to chef-repo directory in home
cd chef-repo
# create new cookbook named webserver
knife cookbook create webserver
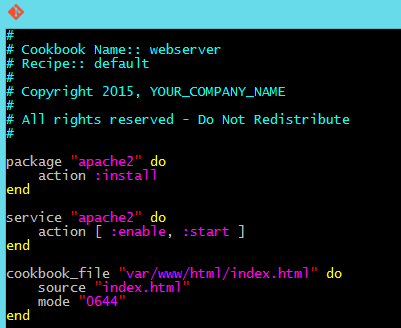
Edit the default recipe for webserver and update content of the file to following. vim editor comes default in the instance, so you could use that. To start inserting text in vim, press the ‘i’ key to enter insert mode. When you have finished editing, press ESC to exit insert mode, then type ‘:wq’ to save and exit the editor.
# edit the default recipe
vim cookbooks/webserver/recipes/default.rb
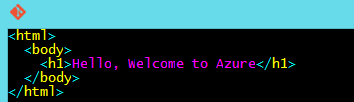
Add index.html file to cookbook’s files/default directory and edit the content.
edit the default index file
vim cookbooks/webserver/files/default/index.html
Upload cookbook to Server
Execute the following commands from the workstation.
# move to home directory
cd
# move to chef-repo directory in home
cd chef-repo
# upload the cookbook to Chef Server
knife cookbook upload webserver
Add cookbook to run list of node
Execute the following commands from the workstation.
# move to home directory
cd
# move to chef-repo directory in home
cd chef-repo
# Add cookbook to the run list of node
knife node run_list add mme-chef-node1 “recipe[webserver]”
Run chef-client on node
Execute the following commands from the Chef Node.
# running chef-client on mme-chef-node1
sudo chef-client
# Ensure that webserver is available on port 80
curl http://localhost/
We have created and executed our first runbook on Azure now. You can learn more about cookbooks from http://learn.chef.io/
Enable endpoint using Azure CLI
We have tested and ensured that web server is running and default index file is returned correctly. However, if you try out http://mme-chef-node1.cloudapp.net/ , the public endpoint 80 of the webserver, you will not get any contents. This is because we only have port 22 in the endpoints of Azure VM. To enable port 80 using Azure CLI, follow the below commands from workstation node.
Login to Azure CLI using your preferred option (Microsoft Account, Organizational Account or Service Principal), following the blog https://manesh.me/2015/10/15/options-for-azure-cli-logins-step-by-step-guidance/
Once you are logged into Azure CLI, execute the following command to check the current details of the virtual machine. Check endpoint information from the result.
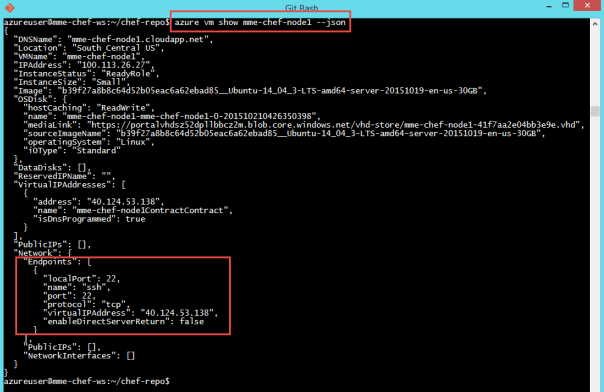
Create new endpoint on port 80. Keep both public port and private port to be 80.

Now we can browse to http://mme-chef-node1.cloudapp.net/ and see that index page is available.
Next Blog
With this blog, we have gone through the basics of working with Chef on Microsoft Azure. In the next series of blogs, I will dive deep into using Azure specific knife commands and using Chef along with Azure Resource Manager templates.
Posted on 2015/10/23, in DevOps, Microsoft Azure and tagged Azure CLI, Chef, Cloud, DevOps, Microsoft Azure, Ubuntu. Bookmark the permalink. 1 Comment.

Pingback: Getting started with Chef on Microsoft Azure | Imagine - Experiment - Realize