Options for Azure CLI Logins – Step by Step Guidance
Azure CLI supports various login options:
-
Interactive login through Browser
- Organizational Accounts (non Multi-Factor Authentication)
- Service Principals / Automation accounts
This blog post is a step by step guidance to try out all the above options. You can read more about the supported options here at https://azure.microsoft.com/en-us/blog/azure-cli-supports-microsoft-account-logins/
Prerequisites
- It is assumed that you have basic knowledge of Microsoft Azure & Azure Management Portal.
- Valid Microsoft Azure Subscription (Signed up with a Microsoft Account)
- For this guidance, I am installing and configuring Azure CLI on Windows using node.js.
Setting up Azure CLI
Install node.js from https://nodejs.org/dist/v4.2.1/node-v4.2.1-x64.msi or latest from https://nodejs.org/en/
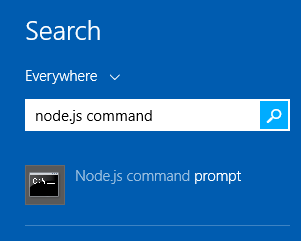
Open node command prompt
Ensure that node and npm are installed successfully by running ‘npm -v’ command

Install Azure CLI
|
npm install -g azure-cli |
Ensure that CLI installation is successful by checking out the ‘azure’ command. Ensure that you have version 0.9.10 or later.

Login with Microsoft Account (Live ID)
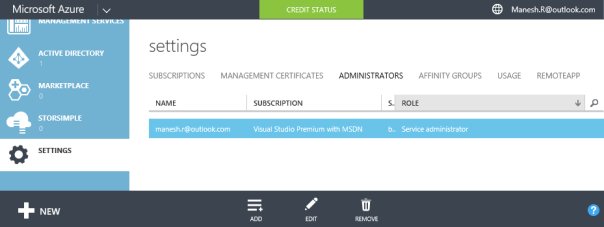
For this login option, I am using the Microsoft Account – manesh_dot_r_at_outlook_dot_com, who is the service administrator for the subscription.
Open Azure Management Portal (https://manage.windowsazure.com/) and navigate to Active Directory
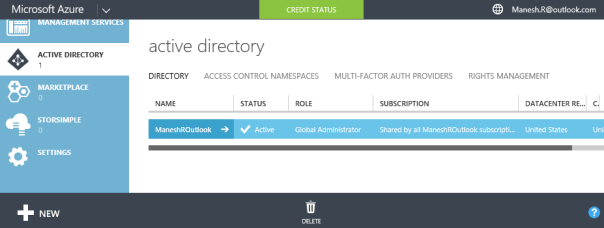
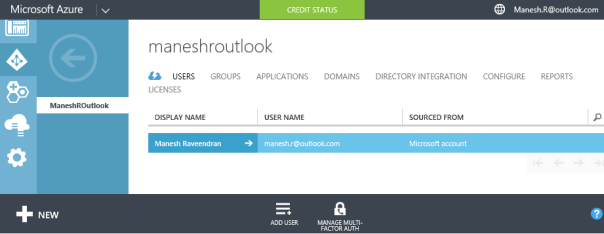
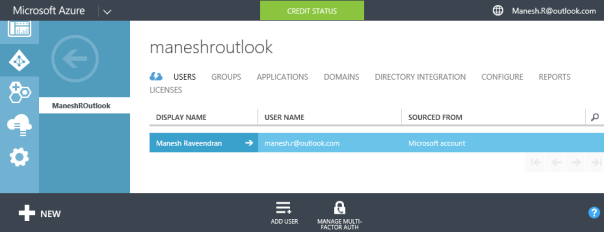
Navigate to Users in the directory and ensure that the account is a valid user in the directory.
Also, navigate to Settings > Administrators and ensure that Microsoft Account is a valid Service Administrator
or Co-administrator. Note that any other Microsoft Account, you add as co-administrator for this page, can also use the same sign-in flow.

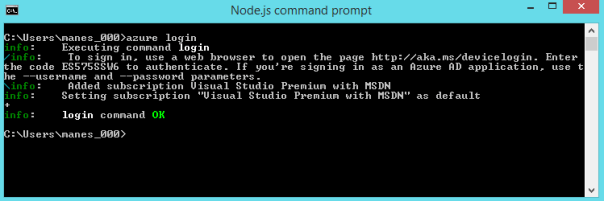
From CLI, run the command ‘azure login’
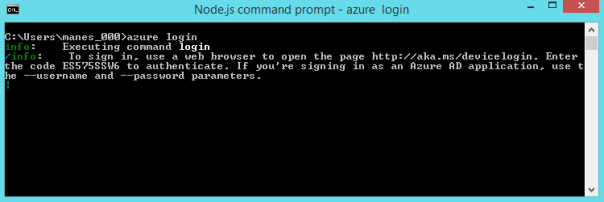
You will see that the command is waiting for you to open a browser, navigate to the specified URL and then enter the code that you see in the command prompt. In this example ES575SSW6 is the code for authentication. I suggest to open a private browser instance and perform the suggested steps.

Now you can login using Microsoft Account or Work / School account with or with-out MFA in this sign in option.
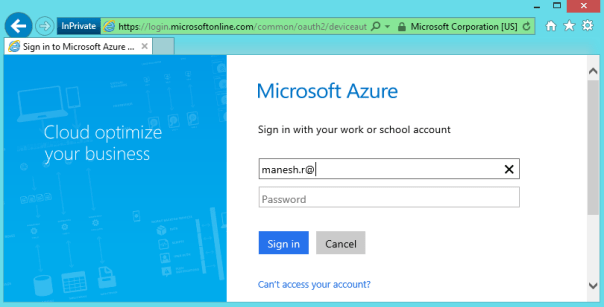
Based on the account you have provided, it will take you to the respective login page. Once you have logged in, you will see a successful message like the following.
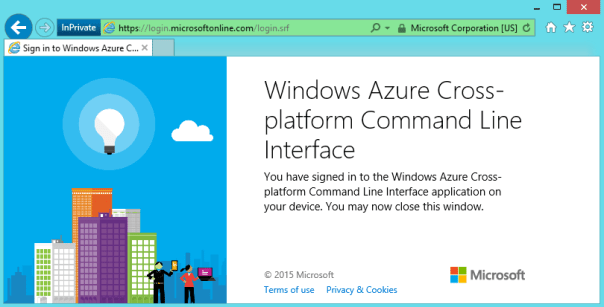
Also, at this point, you can see successful login at the CLI window.
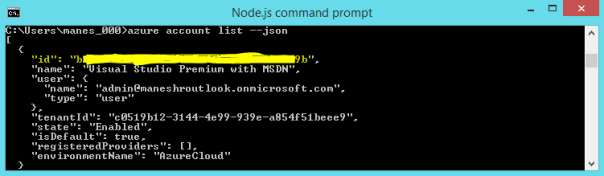
Checkout some sample command to make sure that the login is successful and is returning data from services.
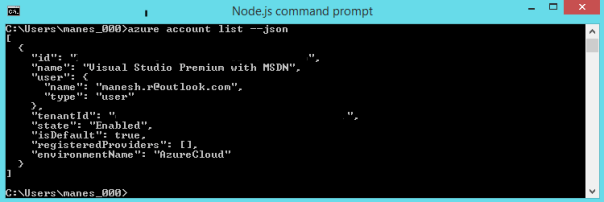
Here you can see that the subscription is listed, and you should be able to run commands to interact with Azure services.
Do remember to logout, once you finish interacting with the service

Login with Organizational Account (Interactive using browser)
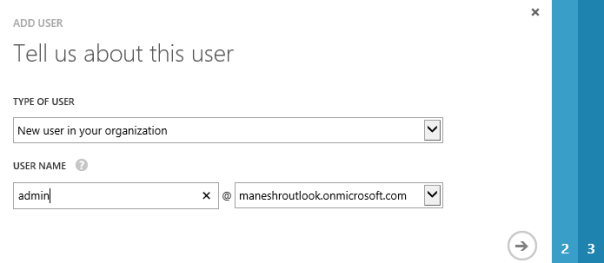
First let us create an organizational account in the same directory. You can do this by navigating to Active Directory > <your_directory> > Users. Note that in my environment, your_directory is maneshroutlook.
Choose Add User option and choose the option to create a ‘New user in your organization’. You will go through steps similar to following.
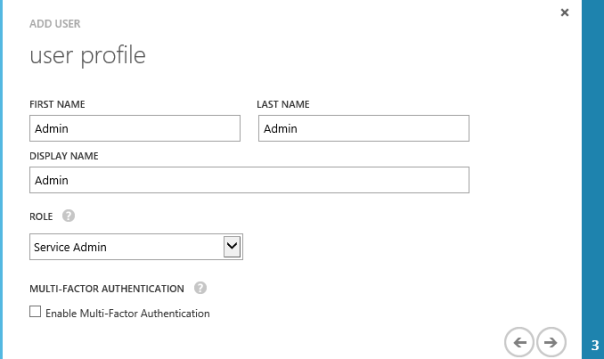
Choose the required user role in the second step. You can read more about roles and their privileges at https://azure.microsoft.com/en-us/documentation/articles/active-directory-assign-admin-roles/
Create the user with temporary password.
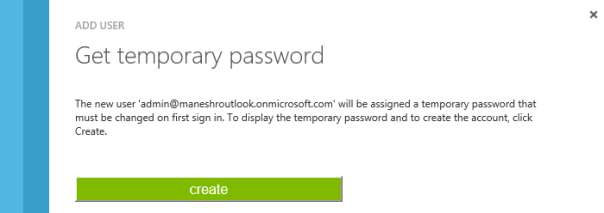
Note down the temporary password for the user.

Now, login to https://manage.windowsazure.com from a private browser instance and login using the organizational account we just created. During this process, you should reset the password for this account. At the end of this step, you will see a page like following, telling that this account do not have any Azure subscriptions. Yes, that is true, we just created an organizational account and haven’t added co-administrator privilege on the subscription. Let us do it now.
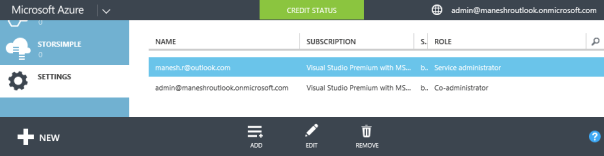
Login to https://manage.windowsazure.com using your primary Microsoft Account and navigate to Settings > Administrators.
Choose Add option and associate the organizational account as a co-administrator for this subscription.

Now, if you refresh the browser instance for your organizational account for URL https://manage.windowsazure.com then you can see that your organizational account have access to the subscription.
So far, we have created an organizational account (this could be enabled with MFA as well). Now you can follow the same sequence of steps in the above login option (Login with Microsoft Account), for an interactive login with organizational account as well. You start with the following step for the sequence.

Login with Organizational Account (Non-interactive, Non Multi-Factor Authentication)
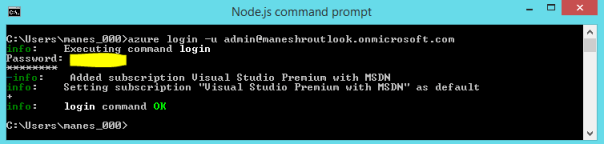
Note that for the non-interactive logins, it only supports organizational account with MFA not enabled. Open CLI, and execute the login command with ‘-u’ option. Note that you will have to press Enter key twice after typing in the password.

Now you are logged in and can execute ‘azure account list –json’ command or other commands to verify that login is successful.
Also, remember to issue the ‘azure logout’ command once you have completed all your interactions with the service.
Login with Service Principals (Automation Accounts in Azure AD)
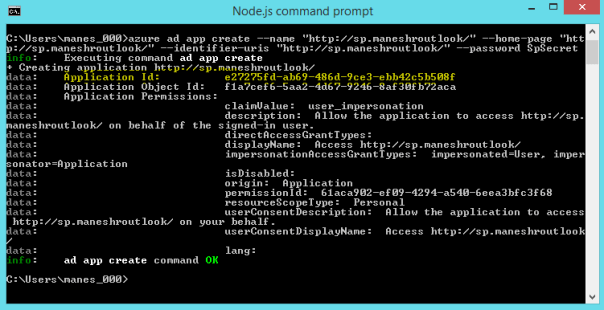
First, we should create a Service Principal. We do this by creating an application in the Azure AD. Since we are exploring Azure CLI, we will create the service principal also using CLI.
First login to the CLI using Microsoft Account or Organizational Account, using any of the above options.
Step by step instructions for the sequence of actions you should be doing are explained well here at https://azure.microsoft.com/en-us/documentation/articles/resource-group-authenticate-service-principal/#authenticate-service-principal-with-password—azure-cli. I am providing the screen captures for the service principal I have created.
Switch config mode to arm.

I used http://sp.<domainname>/ as the identifier and URI for the application that I created.
Use the application id obtained from previous step, to create a service principal.

Use the object id of the service principal to assign permissions. You need to know the subscription id for performing role assignment, you can get the subscription id using listing the account.
Assign role permission to the service principal on the subscription.

Logout the current organizational user.

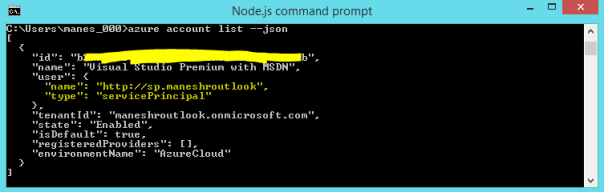
Now login with the service principal and check if we are able to read the service properties. You can use the fully qualified domain name for the tenant value. Or you can use the id shown above in ‘azure account list –json’ command.

Now you are successfully logged in and can interact with various commands. Check out the account list command note that the user type is shown as service principal.
Remember to logout once you complete all the operations.

References
- https://azure.microsoft.com/en-us/documentation/articles/xplat-cli/
- Introduction to CLI – http://www.hanselman.com/blog/ManagingTheCloudFromTheCommandLine.aspx
- Installing CLI – https://azure.microsoft.com/en-us/documentation/articles/xplat-cli-install/
- Developer’s guide to auth with Azure Resource Manager API – http://www.dushyantgill.com/blog/2015/05/23/developers-guide-to-auth-with-azure-resource-manager-api/
- Best practices for Access Management for Azure – http://www.dushyantgill.com/blog/2015/10/12/best-practices-for-access-management-for-azure/
- Automating Azure on your CI server using a Service Principal – http://blog.davidebbo.com/2014/12/azure-service-principal.html
- Service Principal and CLI – https://azure.microsoft.com/en-us/documentation/articles/resource-group-authenticate-service-principal/#authenticate-service-principal-with-password—azure-cli
Posted on 2015/10/15, in Identity & Access Management, Microsoft Azure and tagged Azure AD, Azure CLI, Identity, Microsoft Azure. Bookmark the permalink. 2 Comments.

Pingback: Setup Chef Node on Microsoft Azure | Imagine - Experiment - Realize
Pingback: Writing cookbook on Microsoft Azure | Imagine - Experiment - Realize